ECN Lab 1: Setting up OPNsense Firewall, Suricata IPS and squid web proxy

INTRODUCTION
SCENARIO: We are appointed as security engineer to secure a virtual company named “samyak.org”. Currently there have 50+ employees in the company and there are no security measures, no network management, no AD, nothing just all connected to a LAN.
Hello Visitor, This post is the first installment in my “Enterprise Cyber Security and Networking Lab” (ESN Lab) series. Here I will setup an enterprise level security environment including security solutions such as firewalls, SIEM, IPS and more.
In next blog I will try to make a redundant architecture, by setting up a backup firewall so network can continue during failover conditions.
I will start by setting up the network environment and firewall configuration.
Covered in this post:
- Opnsense firewall setup.
- Suricata IPS setup.
- Suricata custom rules and testing.
- Squid web proxy setup.
- Blacklisting based web filtering.
As in a home lab we not have a WAN we will use virtual NAT network that has internet connectivity.
And make the firewall’s default gateway the gateway of the WAN network.
For the LAN network we will connect a second interface of the firewall to an virtual internal network where the clients will join the firewall (LAN’s gateway)
This will act like a L2 switch behind the firewall.
Below is a representation of the lab: 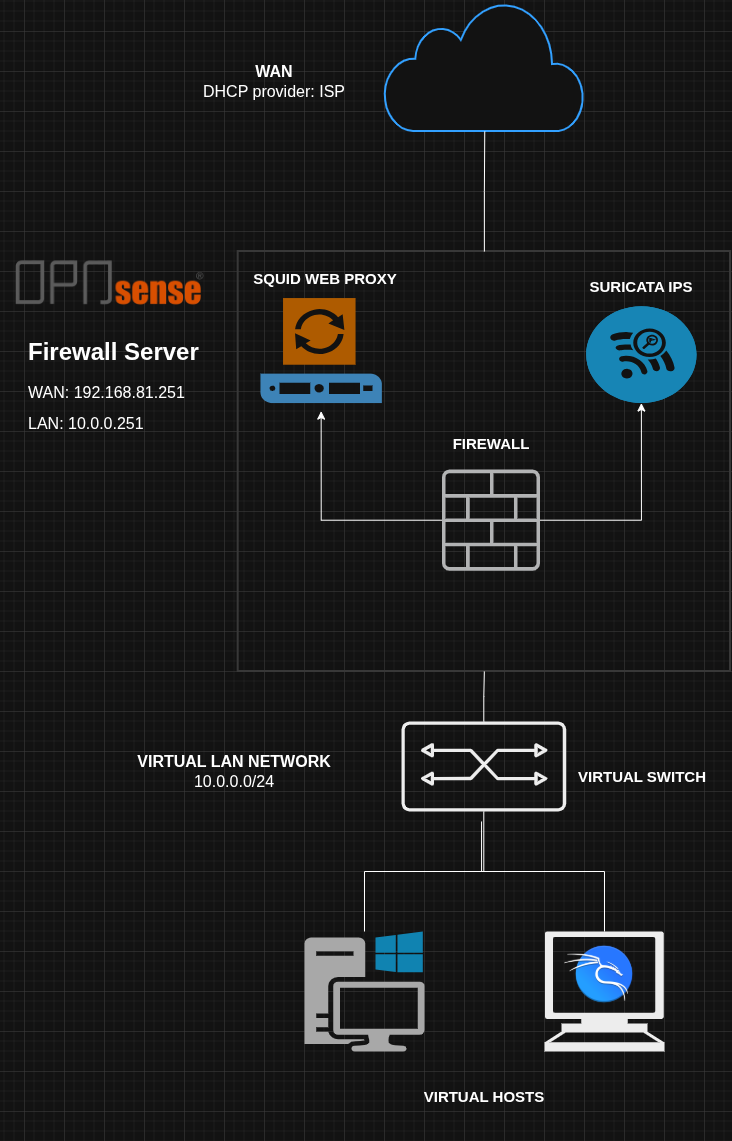
OPNSENSE INSTALLATION
Head to the Opensense website and install the DVD ISO. 
Virtual Box
- Use Virtual box for this home lab. Do NOT use vmware workstation as it’s MAC spoofing security will hinder CARP and virtual IP connectivity later in the lab.
- I spent 10+ hours trying to troubleshoot this issue without any success.
- In case of vmware ESXI and Vsphere allowing MAC changing and forced transmissions, should solve this issue.
Install Virtual box > New > select Opnsense ISO.
Acceptable configurations
- RAM: 2 GB
- Adapter 1: Internal Network
- Adapter 2:
- CPU: 2 cores
Go with the installer install on the virtual disk (8 gb). Also, we might need to attach the installation media (opnsense ISO) while the first boot.
INITIAL CONFIGURATION
Head over Interface assignment and identify em/x using MAC addresses
For my VM:
| Interface in Opnsense | Interface in LAB | Interface in Virtual box | IP range |
|---|---|---|---|
| em0 | LAN | internal network (intnet) | 10.0.0.0/24 |
| em2 | WAN | NAT network (internet_simulator) | 192.168.81.0/24 |
Next we will assign manual IP to the LAN and WAN interfaces.
Two things we skip for now:
- LAGG: Link Aggregation Group, If we have multiple network interfaces on firewall we could group 2 or 4 of them, to create a more redundant high speed link.
- VLAN: virtual LAN, segments in LAN and switches.
We will only configure the WAN and LAN interfaces.
Set the WAN gateway as 192.168.81.1 (vbox NAT gateway) for internet access on opnsense.
Attach a Kali VM to the LAN network we will now access the Console.
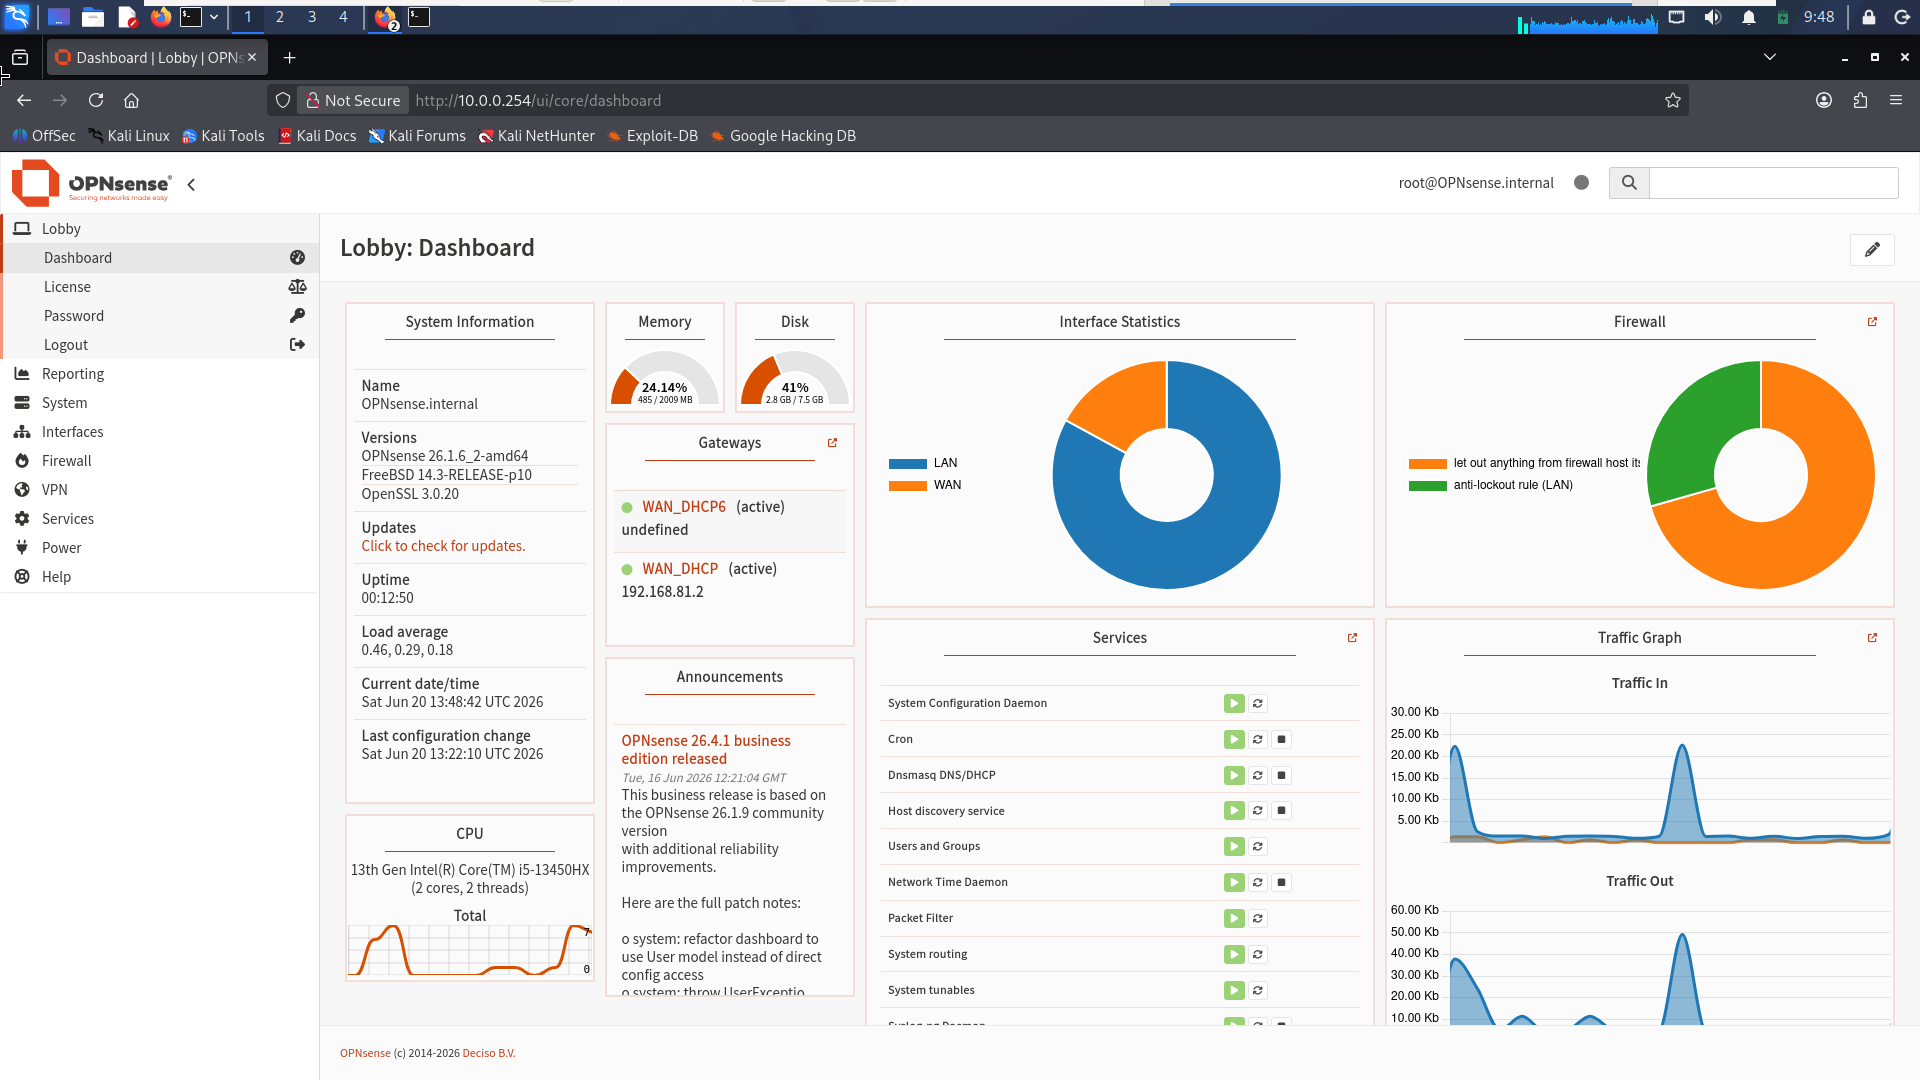
Go to firmware > Updates to install and update the vmware tools and the OS.
SURICATA IPS / IDS
Suricata is a very well known IPS / IDS and comes built in with OpnSense.  We will set it on our LAN interface as we want to monitor the activites of the connected hosts.
Some important settings:
- Hyperscan: One of the latest pattern matching algorithms.
- Home Network: Our LAN network range.
- Promiscuous mode: Help IPS monitor traffic intended for other hosts.
Screenshot for reference. 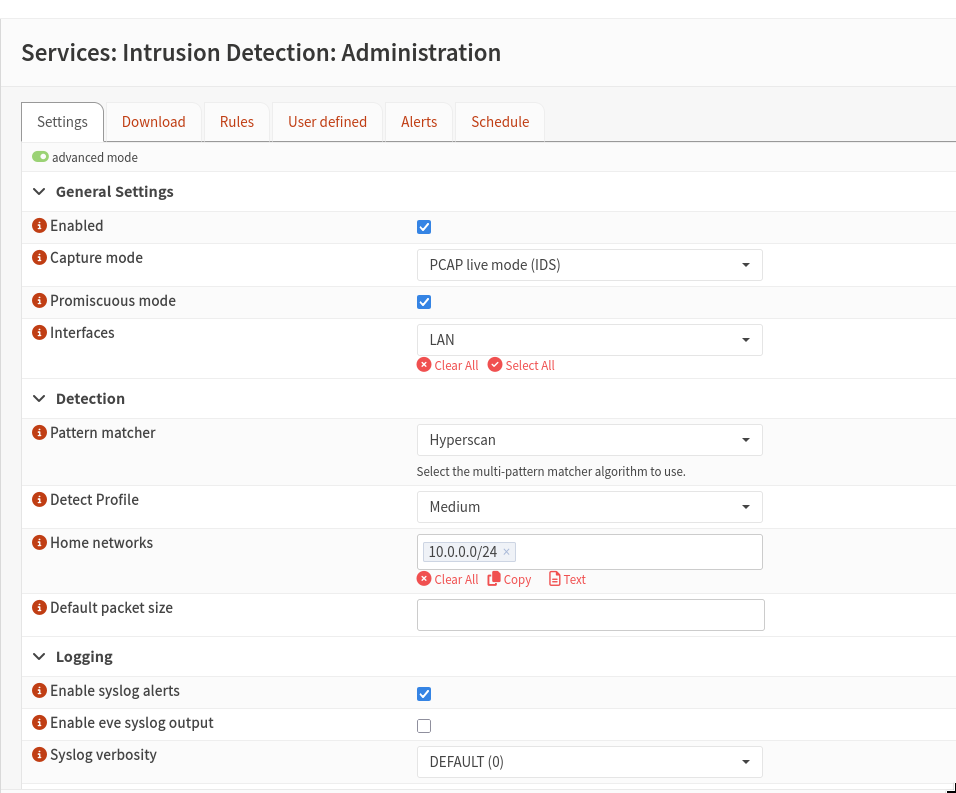
Custom rule making
We can add professional rule-sets in Suricata. But, we will make a trivial rule to detect an nmap SYN scan of the firewall itself.
LOGIC:
- When an port scan takes place hundreds of ports are scanned in one second.
- Rate limiting and TCP flag techniques exist, but aim is to stop the most basic port scan.
- A rule that detects if there are more than 50 SYN packets to our firewall, under one second will do the job.
1
alert tcp $HOME_NET any -> 10.0.0.251/24 any (msg:"POSSIBLE NMAP SYNSTEALTH SCAN DETECTED"; flow:stateless; flags:S; priority:5; threshold:type threshold, track by_src, count 50, seconds 1; classtype:attempted-recon; sid:1234;)
- alert: what to do?
tcp $HOME_NET any: protocol, source_IP and source_port (anywhere from our home network, see above image)10.0.0.251/24 any: destination_IP and destination port (the firewall server’s any port)flag S: SYN scan.count 50, seconds 1: 50+ packets counted under 1 second.- Other information can be seen in suricata docs.
- Use proper rule syntax, send it to AI for syntax checking.
- refresh the IPS server after updating the rules.
As we want to save this rule on the firewall one option it to save it on the kali VM connected to LAN, with this file:
1
2
3
4
5
6
7
8
<?xml version="1.0"?>
<ruleset documentation_url="http://docs.opnsense.org/">
    <location url="http://10.0.0.134/" prefix="customnmap"/>
    <files>
        <file description="customnmap rules">customnmap.rules</file>
        <file description="customnmap" url="inline::rules/customnmap.rules">customnmap.rules</file>
    </files>
</ruleset>
See, our aim is to demonstrate that Suricata can download rules from a remote server. So, we will add Kali VM IP (10.0.0.134) in this XML and add our rule name customnmap.rules.
next we will start a python server on the same folder
1
python3 -m http.server 80
Opnsense by default comes with SSH open. So transfer XML to /usr/local/opnsense/scripts/suricata/metadata/rules directory.
import the rule in the rules directory, refresh the IPS server > download > enable the rule. 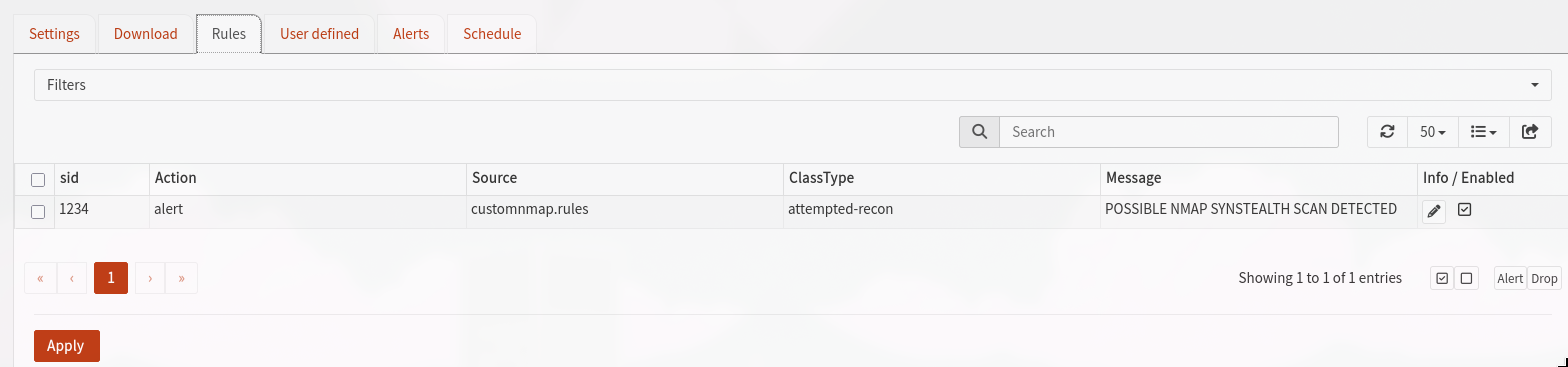
Testing IDS Rules
After doing an nmap scan (50+ SYN requests in 1 sec) from kali.
1
$ sudo nmap -sS firewall_ip
See the alerts (my firewall IP was 10.0.0.254 at the time). 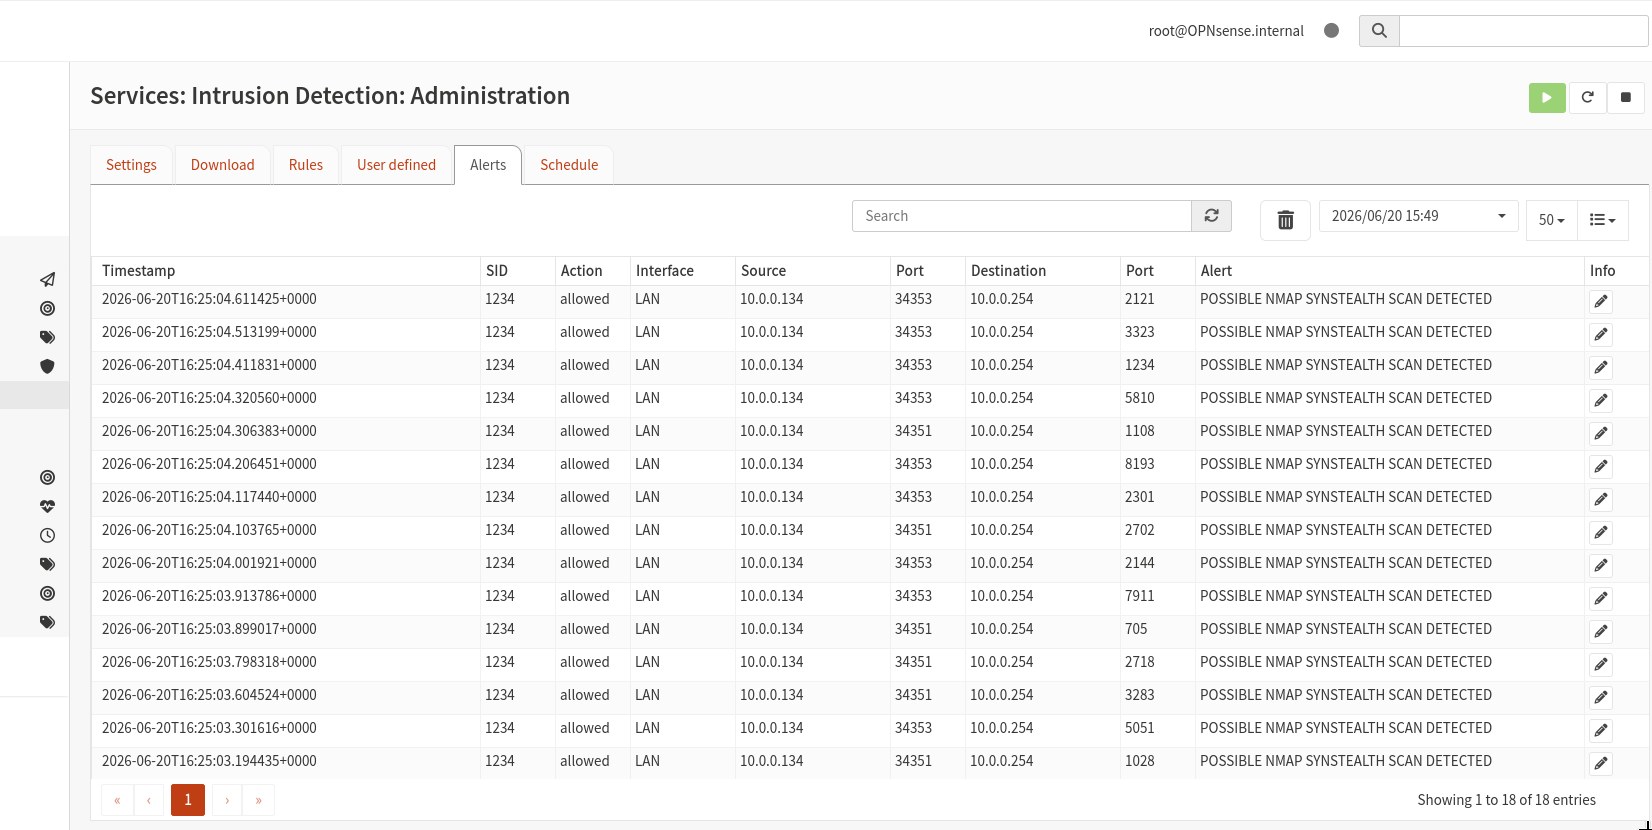
SQUID WEB PROXY
TASK: Lot of employees are wasting their time on social media platforms instead of work so we need to block these websites.
PLAN: We will use a proxy filter that will stop machines inside the network from reaching particular websites (social media, etc). Also we will make a transparent proxy to see the traffic.
Squid is another popular web proxy, It comes with features like caching for performance improvement to blacklist based website filtering SquidGuard.

Earlier Opnsense shipped with squid but now we need to enable in plugins.
Certificate Authority
This setup will use MITM techniques to for HTTPS connection we need to add our proxy certificate to the hosts.
For that, create a Certificate authority (CA) on the OPNsense firewall (for SSL transparent proxy setup). System > trust > authorities.
We can add our organization details in this certificate.
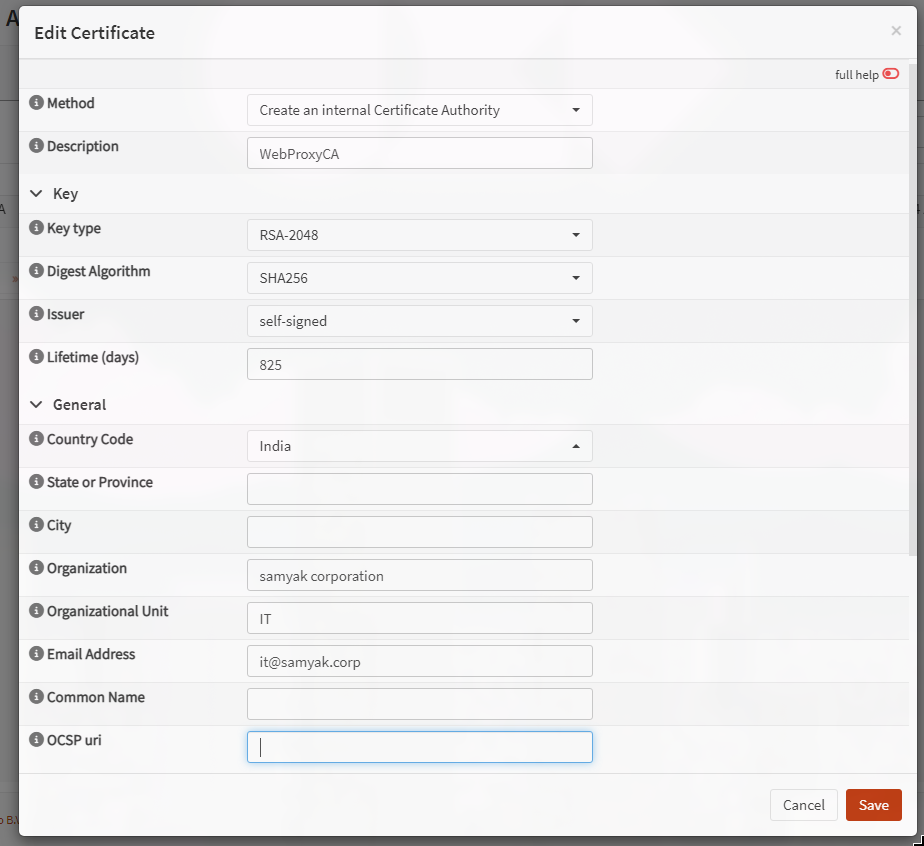
To deploy certificates we may:
- manually download this certificate to the windows workstations.
- Use GPO
- Use AD certificate services
change the cert file extension from .pem to .crt
right click > install cert > install on local machine > put on trusted root folder > done
web proxy
now the client trust our certificate, we can go for the web proxy.
- Install the os-squid in the system > firmware > plugins.
- check proxy and use OPNsense error pages > appy.
- Just like the IPS there will be an icon on top to start the proxy.
We need to turn on some setting in the forward proxy menu.
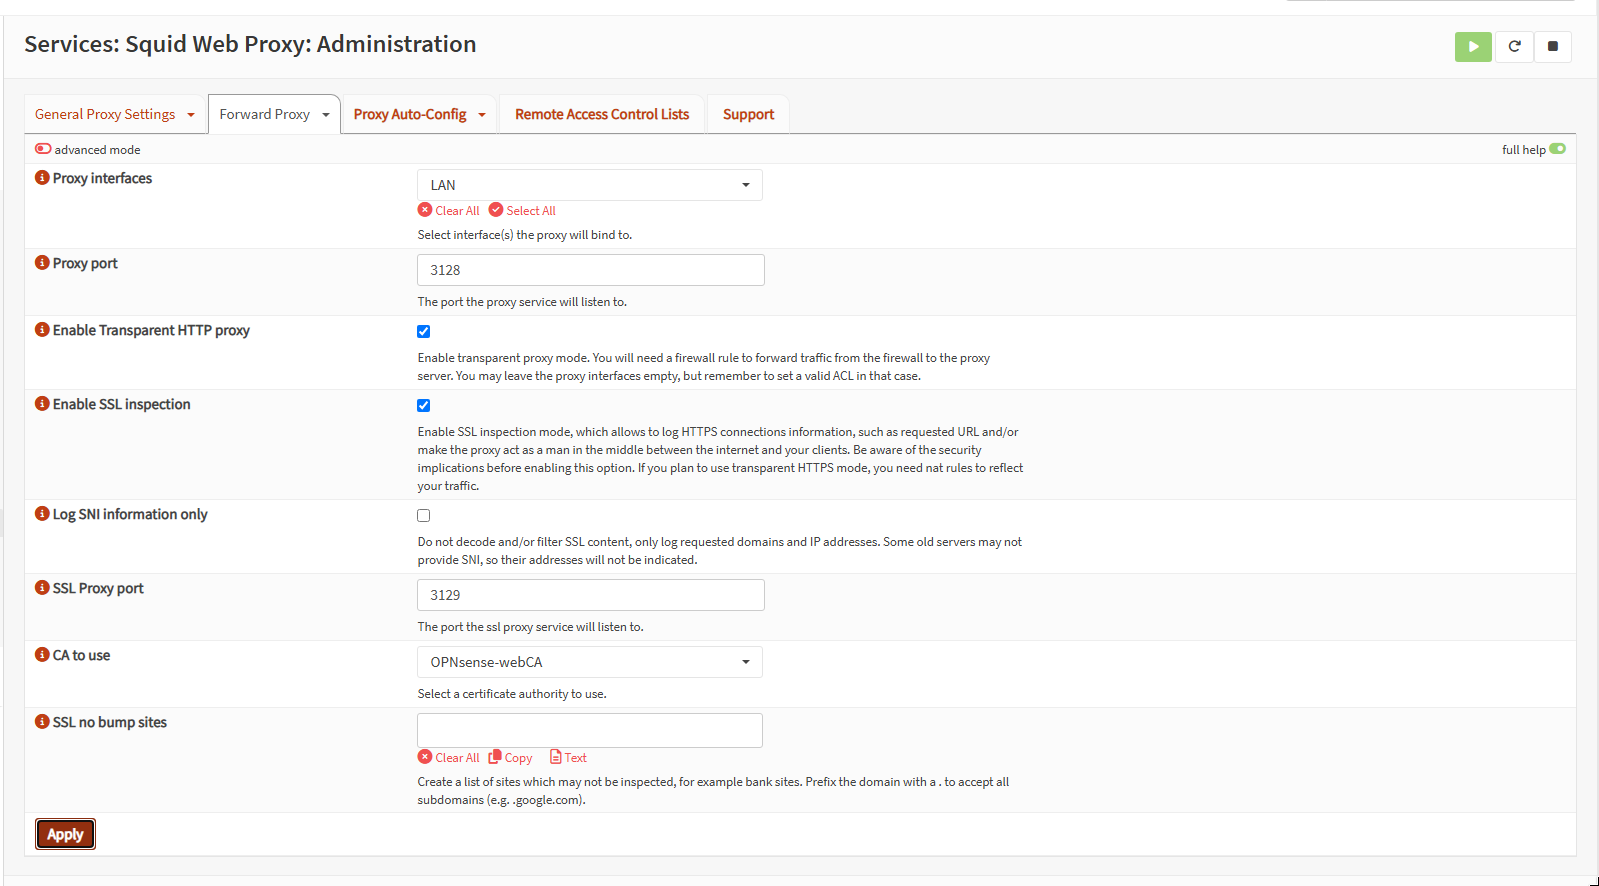
Redirection rule
Now we need to tell the firewall to send any HTTP / HTTPS traffic to it should be redirected to the respective proxies running on it.
Firewall > NAT > Destination NAT > new rule (as redirection rules are configured here).
we need to redirect all traffic from LAN net -> anywhere port 80 (HTTP), toward our firewall proxy listener (127.0.0.1:80).
[Docs][https://docs.opnsense.org/manual/how-tos/proxytransparent.html] 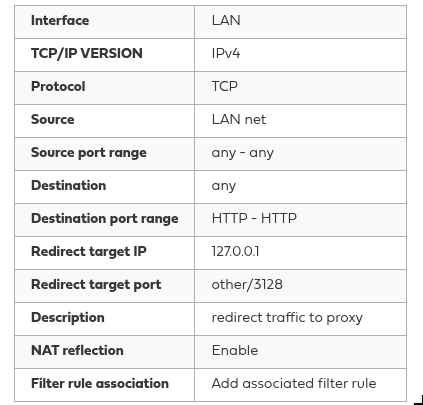
SSL proxy?
Some people on reddit say it creates issues and it does, due to HTTPS and browser security. But here we will make a rule from the documentation
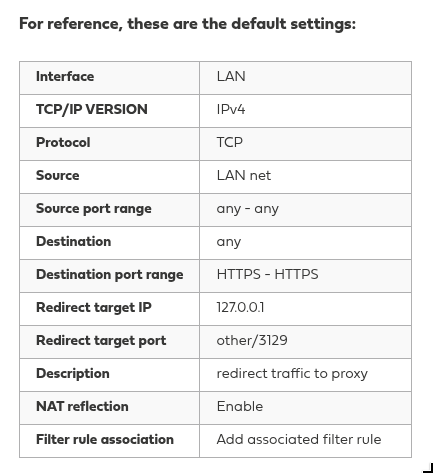
SSL no bump sites?
We can add sites which this proxy avoids, as this is an MITM method secure websites like banking websites might identify our connection as malicious. https://docs.opnsense.org/manual/how-tos/proxytransparent.html&v=o67NaMbjwaE
Also disable any proxy auth. This will make users authenticate before browsing and logging the history against their accounts, an enhanced security feature but not required in transparent proxy.
Blacklist
Go to Remote accesss control, we can add a blacklist / URL to one. LINK this is used in video Next we can download ACLs > edit > categories > select desired ones > download ACL again > apply.
Stop people from bypassing the proxy
Make sure of the sequence.
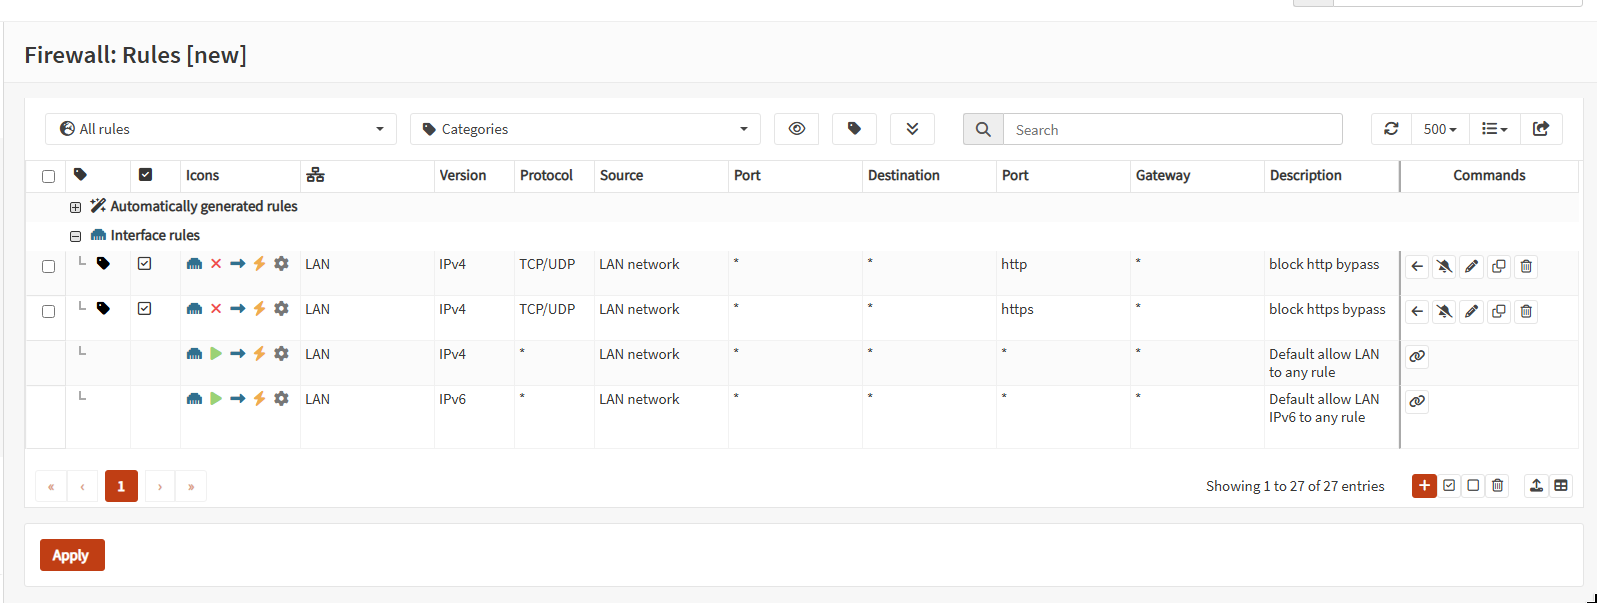
In auto generated rules there are anti-lockout rules, that prevent us from blocking ourselfs from the web GUI. so our rules should’nt be above those.
Set the firewall as the default gateway in the windows host and connect it only to the LAN network for proxy / filter to work.
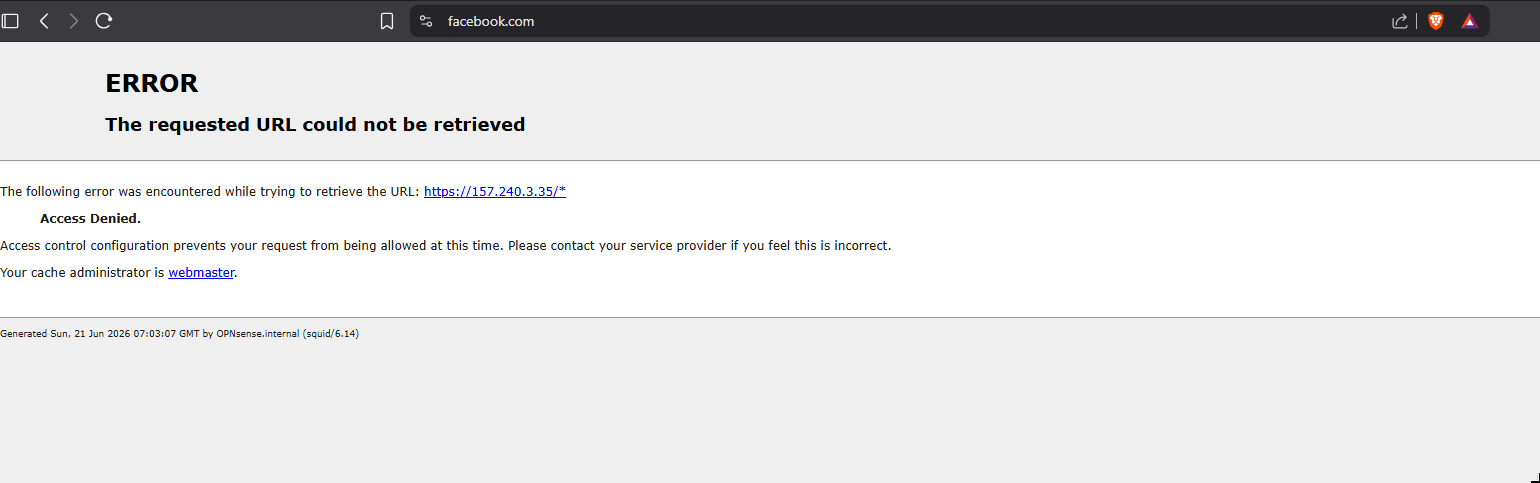
Finally after all this jargon, we will notice two things from the windows host:
- Internet will work.
- Social media sites does not.
Thanks for reading meet you in SL2 post.