ECN Lab 5: Designing an Incident Response and Threat Intel platform - Containerization deployment.

INTRODUCTION
SCENARIO: We are appointed as security engineer to secure a virtual company named “samyak.org”. Currently there have 50+ employees in the company and there are no security measures, no network management, no AD, nothing just all connected to a LAN.
Welcome to the fifth installment in my “Enterprise Cyber Security and Networking Lab” (ECN Lab) series.
So far we had:
- Isolated the WAN network from Clients using a firewall server and a switch.
- Designed a HA firewall fail-over architecture (for the sake on simplification I will remove that from here).
- Designed a multi WAN fail-over and load balancing architecture.
- Installed a wazuh server in the network and connected hosts and IDS to it.
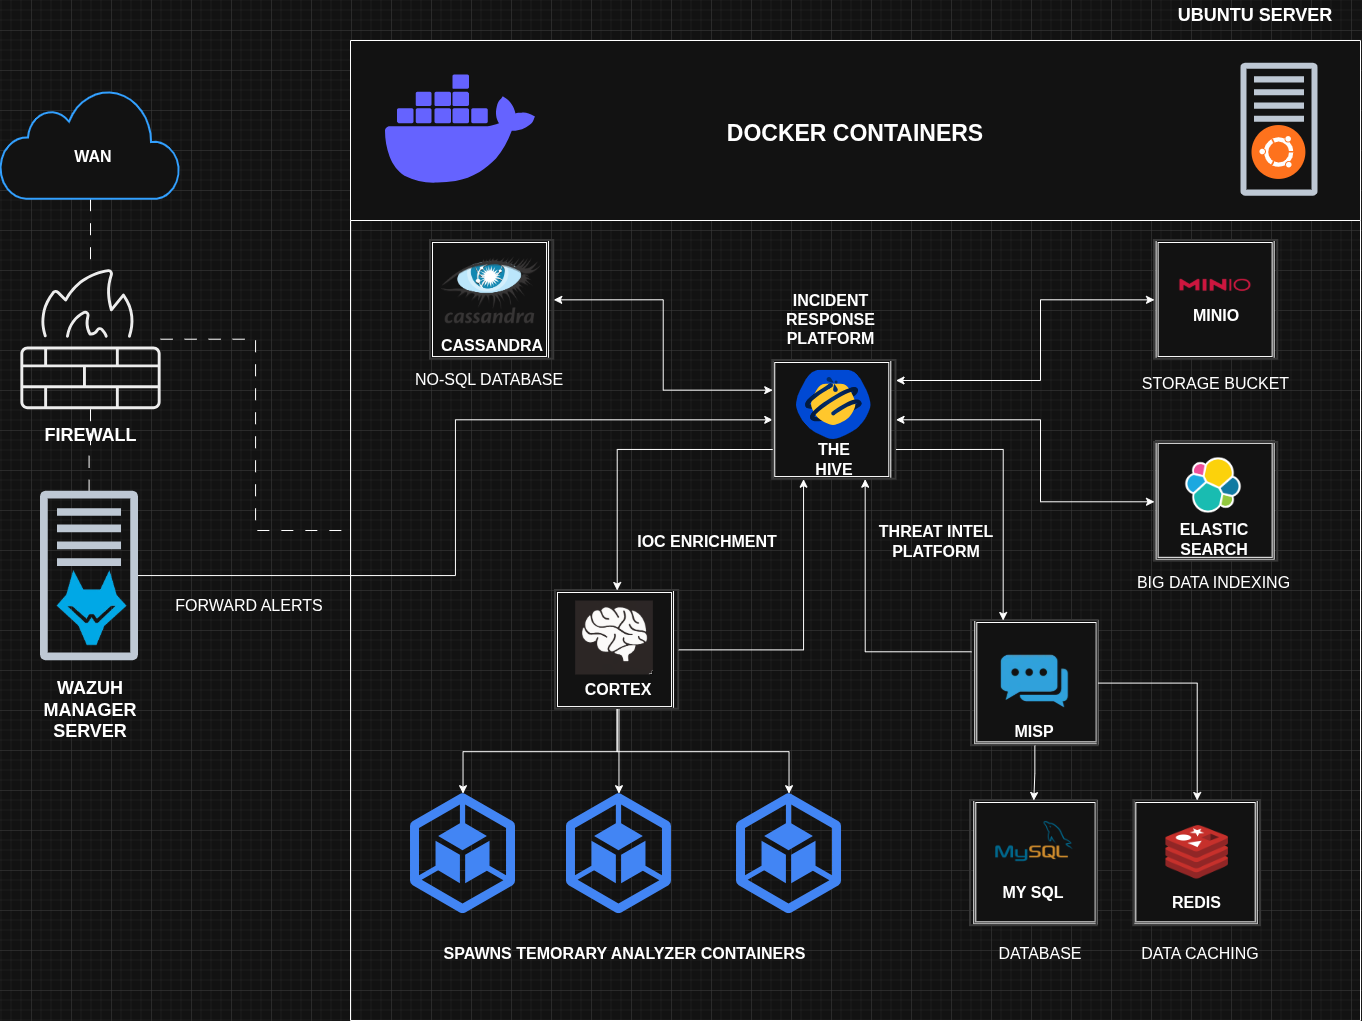
Our Aim is to design a complete Incident Response and Threat Intelligence platform for the organization.
We will Deploy 8+ services as docker containers and the wazuh server will send logs to them for enrichment, threat intel, etc.
WHY WAZUH WASN’T ENOUGH
IR PLATFORM
A SIEM is a great tool but it can only generate alerts. For a SOC team we need to create and incident from alerts, keep it’s track, assign it to other analysts.
Also we will want to attach some description and evidence, screenshots, IPs, file samples, etc.
THREAT INTELLIGENCE
Suppose we saw an unknown executable being executed, or connections from and unknown IP address.
In an Incident response case we can’t open 10+ browser tabs and search virustotal, malware bazaar, etc.
We will also want to share our findings with other organizations, on an opensource platform.
Time is of the essence.
DOCKER SETUP
As I will deploy these cybersecurity products on docker. We will need a linux host for the best performance.
UBUNTU SERVER
Just download the ISO from the official website. Run it and just follow along, download / enable SSH server when asked. My server’sIP: 10.0.0.136
I told in last blog we can’t tolerate a time issue with SOC work. For me there was a time zone issue on the server.
1
2
3
vmware-toolbox-cmd timesync enable
timedatectl set-timezone Asia/Kolkata
timedatectl
INSTALL DOCKER
Docker containers are a very lightweight substitute to virtual machines. Using the host’s kernel’s as for their purposes.
The Ubuntu server doesn’t have official docker repository / packages by default, we will need to add it manually. Official docker repository has latest updates, patches and recommended in a production environments.
Docker already have an excellent guide on this, and I’m not reinventing the wheel. Do check it out from here.
I also recommend adding your user to the docker group. so we don’t have to sudo-fu again and again.
UNDERSTANDING THE HIVE, MISP AND CORTEX ECOSYSTEM
Here, I will explain the need of the application, and include the docker compose snippet used to spin-up the container.
NOTE: All the containers are placed under SOC_NET network (172.18.0.0/16)
To forward a container port on host machine
1
2
ports:
 - "<HOST-IP>:<HOST-PORT>:<CONTAINER-PORT>"
THE HIVE
The Hive is the incident response platform, we can use it to:
- Make cases
- Track cases
- Add evidence and information to that case
It uses Cassandra as it’s database, ElasticSearch to index large amount of data (alerts), MINIO as a storage bucket (equivalent to a local S3 bucket).
We will also connect it with MISP to query it’s database and share our own findings.
Lastly it can connect with cortex, to run it’s analyzers on artifacts like IP and file hashes in real time.
1
2
3
4
5
6
7
8
9
10
11
12
13
14
15
16
17
18
19
20
21
22
23
24
25
26
27
28
29
30
31
32
33
34
35
36
  thehive:
    image: strangebee/thehive:5.2
    container_name: soc-thehive
    restart: unless-stopped
    depends_on:
      - cassandra
      - elasticsearch
      - minio
      - cortex.local
    mem_limit: 1500m
    ports:
      - "0.0.0.0:9000:9000"
    environment:
      - JVM_OPTS="-Xms1024M -Xmx1024M"
    command:
      - --secret
      - "lab123456789"
      - "--cql-hostnames"
      - "cassandra"
      - "--index-backend"
      - "elasticsearch"
      - "--es-hostnames"
      - "elasticsearch"
      - "--s3-endpoint"
      - "http://minio:9002"
      - "--s3-access-key"
      - "minioadmin"
      - "--s3-secret-key"
      - "minioadmin"
      - "--s3-use-path-access-style"
    volumes:
      - thehivedata:/etc/thehive/application.conf:ro
      - thehivedata:/etc/thehive/data
    networks:
      - SOC_NET
The same dependencies are included in the compose to start before soc-thehive container.
As commands we have provided endpoints for other services, and some secrets.
We had included application config and data as volume so they even live after container stops.
remember the S3 related command from here, we will see those in MINIO section.
APACHE CASSANDRA
A high performance no SQL database used by the hive, to store application data.
1
2
3
4
5
6
7
8
9
10
11
12
13
14
  cassandra:
    image: 'cassandra:4'
    container_name: soc-cassandra
    restart: unless-stopped
    ports:
      - "0.0.0.0:9042:9042"
    environment:
      - CASSANDRA_CLUSTER_NAME=TheHive
      #- CASSANDRA_NUM_TOKENS=256 # check these later
      #- CASSANDRA_START_RPC=true
    volumes:
      - cassandradata:/var/lib/cassandra
    networks:
      - SOC_NET
ELASTICSEARCH
A big data indexing software, can index millions of logs into fast and query-able format.
1
2
3
4
5
6
7
8
9
10
11
12
13
14
15
16
17
18
19
  elasticsearch:
    image: docker.elastic.co/elasticsearch/elasticsearch:7.17.9
    container_name: soc-elasticsearch
    restart: unless-stopped
    mem_limit: 512m
    ports:
      - "0.0.0.0:9200:9200"
    environment:
      - discovery.type=single-node
      - xpack.security.enabled=false
      - cluster.name=hive
      - http.host=0.0.0.0
      - "ES_JAVA_OPTS=-Xms256m -Xmx256m"
      # check this too
      #- bootstrap.memory_lock = true
    volumes:
      - elasticsearchdata:/usr/share/elasticsearch/data
    networks:
      - SOC_NET
We will run in this single node (not as a cluster), the xpack.security.enabled should be true for a prod environment.
Lastly, we include the cluster name hive and container’s own IP 0.0.0.0
MINIO
Imagine AWS s3 bucket, we can put any type of data in that.
That’s what the hive uses and S3 bucket to store samples and evidence from cases. But as we are not having an S3 bucket in native cloud.
That’s where MIINIO comes in a self hosted local S3 bucket.
1
2
3
4
5
6
7
8
9
10
11
12
13
14
15
16
  minio:
    image: quay.io/minio/minio
    container_name: soc-minio
    restart: unless-stopped
    # check against these
    # command: ["server", "/data", "--console-address", ":9002"]
    command: ["minio", "server", "/data", "--console-address", ":9002"]
    environment:
      - MINIO_ROOT_USER=minioadmin
      - MINIO_ROOT_PASSWORD=minioadmin
    ports:
      - "0.0.0.0:9002:9002"
    volumes:
      - "miniodata:/data"
    networks:
      - SOC_NET
CORTEX
It is the platform we will use to enrich the artifacts we get in the-hive. It will run analyzers on data to (mostly python scripts) to detect IOC’s. Using third party platforms and APIs.
These analyzers are also short-lived containers which cortex spawn to run these scripts.
1
2
3
4
5
6
7
8
9
10
11
12
13
14
15
16
17
18
  cortex.local:
    image: thehiveproject/cortex:latest
    container_name: soc-cortex
    restart: unless-stopped
    environment:
      - job_directory=/tmp/cortex-jobs
      - docker_job_directory=/tmp/cortex-jobs
    volumes:
      - /var/run/docker.sock:/var/run/docker.sock
      - /tmp/cortex-jobs:/tmp/cortex-jobs
      - ./cortex/logs:/var/log/cortex
      - ./cortex/application.conf:/cortex/application.conf:ro # A mount option change here
    depends_on:
      - elasticsearch
    ports:
      - "0.0.0.0:9001:9001"
    networks:
      - SOC_NET
Look at the volumes these are bind mounts, form host file system to the container (including permissions).
MISP
It is an opensource malware information and IOC data sharing platform. We can use this data in our organization also contributing this so it can help others.
As this theat intel paltform is hosted by us we will have to manage caching. It supports redis for that.
1
2
3
4
5
6
7
8
9
10
11
12
13
14
15
16
17
18
19
20
21
22
23
24
25
26
27
28
29
30
31
32
  misp.local:
    image: coolacid/misp-docker:core-latest
    container_name: soc-misp
    restart: unless-stopped
    depends_on:
      - misp_mysql
      # adding redis too
      - redis
    ports:
      - "0.0.0.0:80:80"
      - "0.0.0.0:443:443"
    volumes:
      - "./server-configs/:/var/www/MISP/app/Config/"
      - "./logs/:/var/www/MISP/app/tmp/logs/"
      - "./files/:/var/www/MISP/app/files"
      - "./ssl/:/etc/nginx/certs"
    environment:
      - MYSQL_HOST=misp_mysql
      - MYSQL_DATABASE=mispdb
      - MYSQL_USER=mispuser
      - MYSQL_PASSWORD=misppass
      - MISP_ADMIN_EMAIL=mispadmin@lab.local
      - MISP_ADMIN_PASSPHRASE=mispadminpass
      # changin the base URL from localhost ot ubuntu server's IP
      - MISP_BASEURL=https://10.0.0.136
      - TIMEZONE=Asia/Kolkata
      - "INIT=true"
      - "CRON_USER_ID=1"
      - "REDIS_FQDN=redis"
      - "HOSTNAME=https://10.0.0.136"
    networks:
      - SOC_NET
This will use the mysql and redis containers to store data and for caching to improve query performance ( Caching is recommended for production environments).
DOCKER COMPOSE
Dowload from here.
1
2
3
4
5
6
7
8
9
# make a directory to put the docker-compose.yml in it.
mkdir SOCker

# put the docker-compose here
# run the compose
docker compose up -d

# stop all the containers and network
docker compose down
NOTE: In a production environment it’s recommended to use host based firewalls like UFW, at that time we will need to allow the exposed ports.
1
2
# view the running containers
sudo docker compose ps

INITIAL SETUP
MISP
Head to https://10.0.0.136 , certificate is not imported. Use the default credentialsadmin@admin.test:admin.
Make a new password.
Now add our custom organization and an administrator account.
- Go to Administration > add organization > make “samyak corporation LLC”
- Go to Administration > add user > make a
Org Adminuser (more users may be created depending on the permissions).
Click on this view icon, and generate an auth key. NOTE THAT KEY SOMEWHERE. 
CORTEX
http://10.0.0.136:9001
Update the database if prompted, and make any admin user for now.
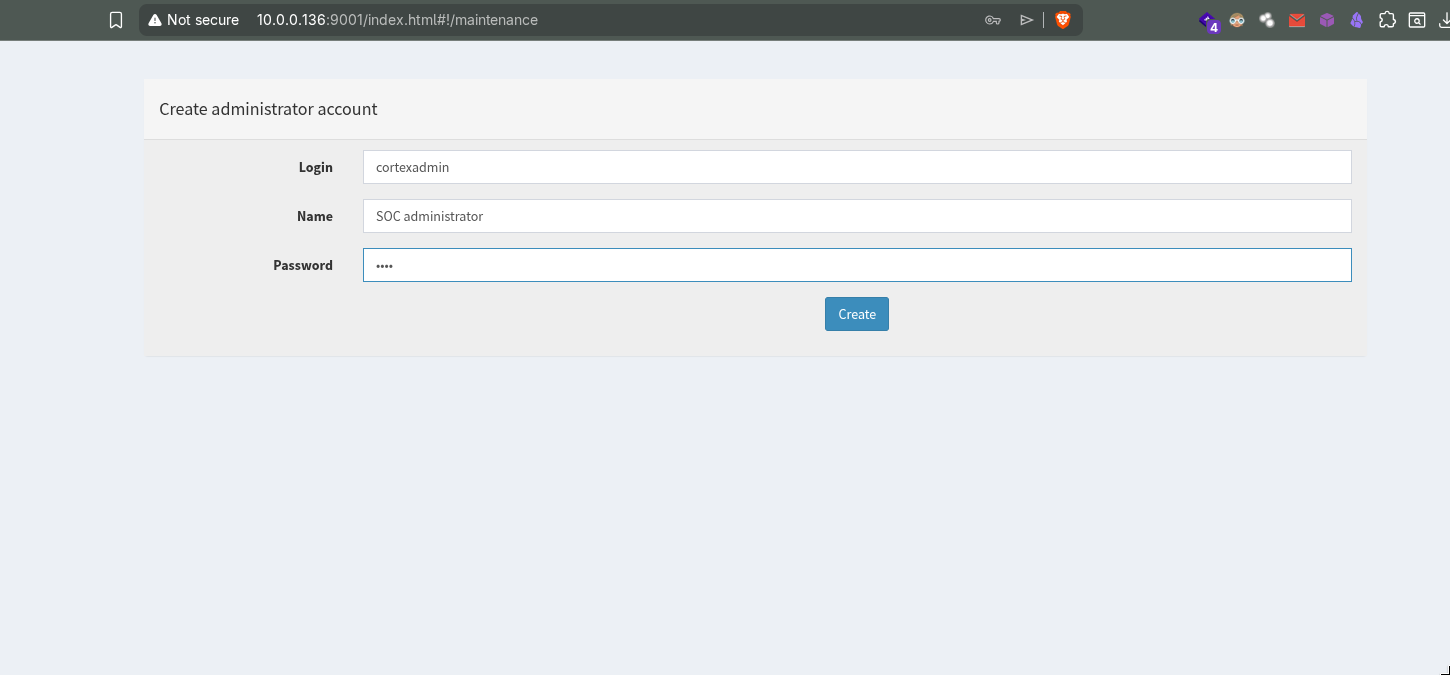
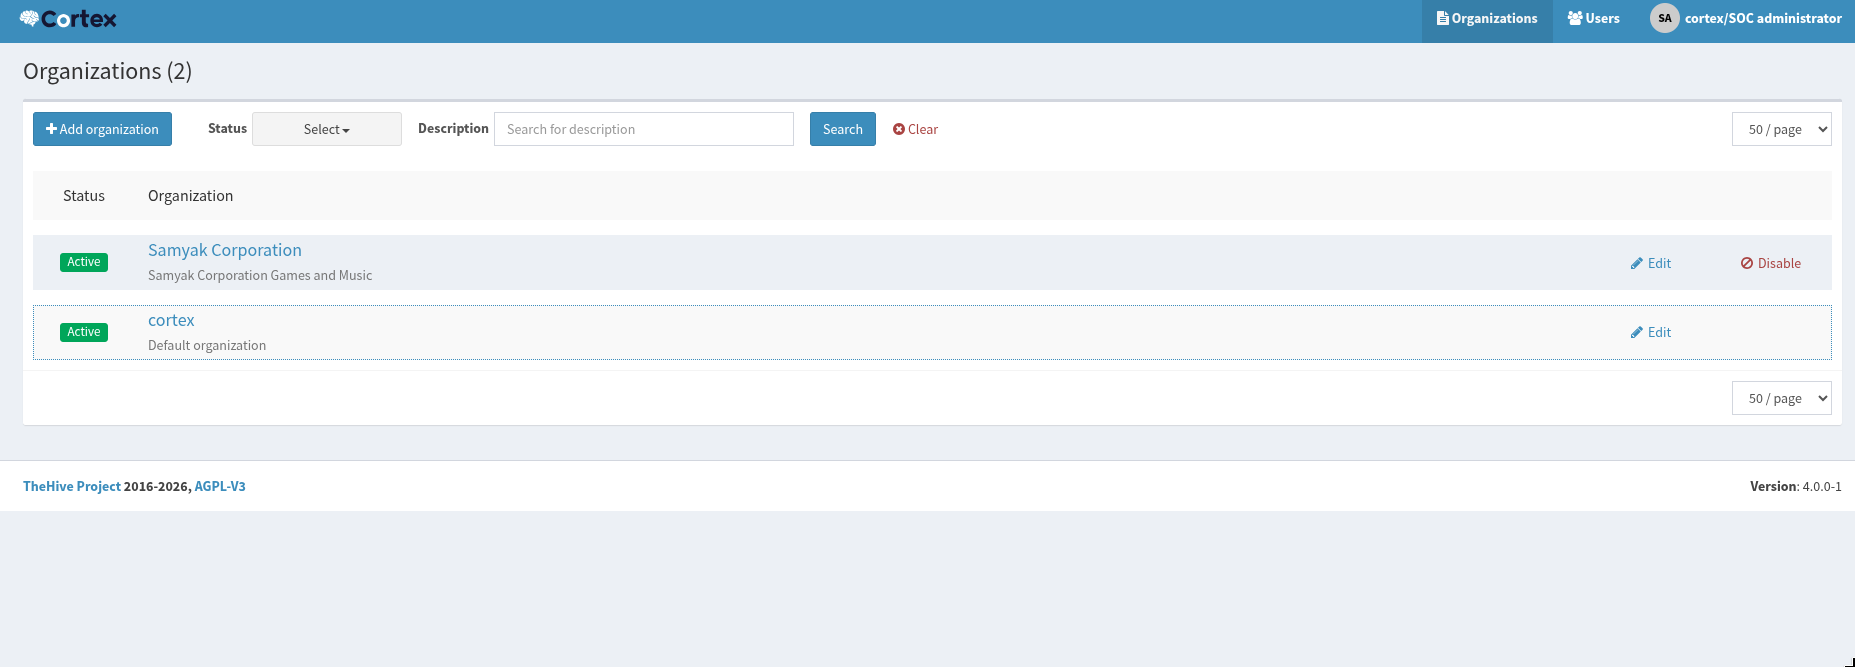
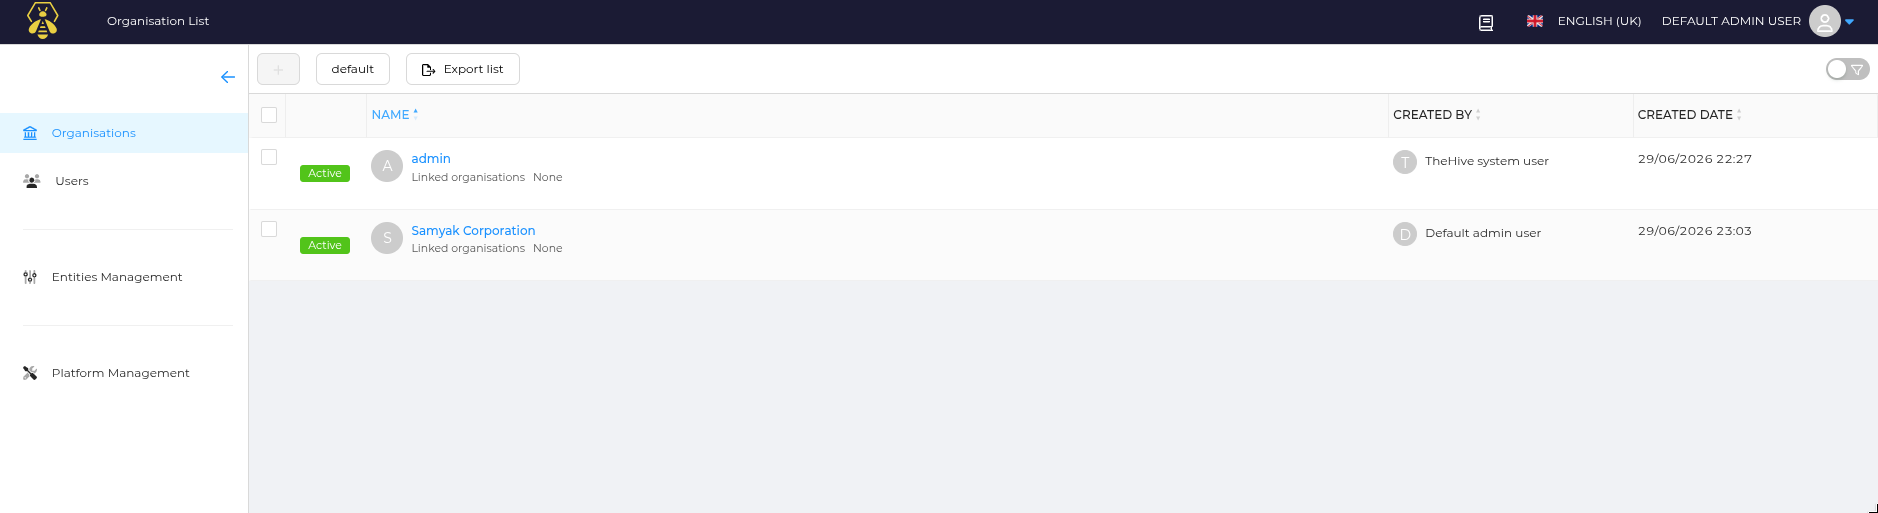
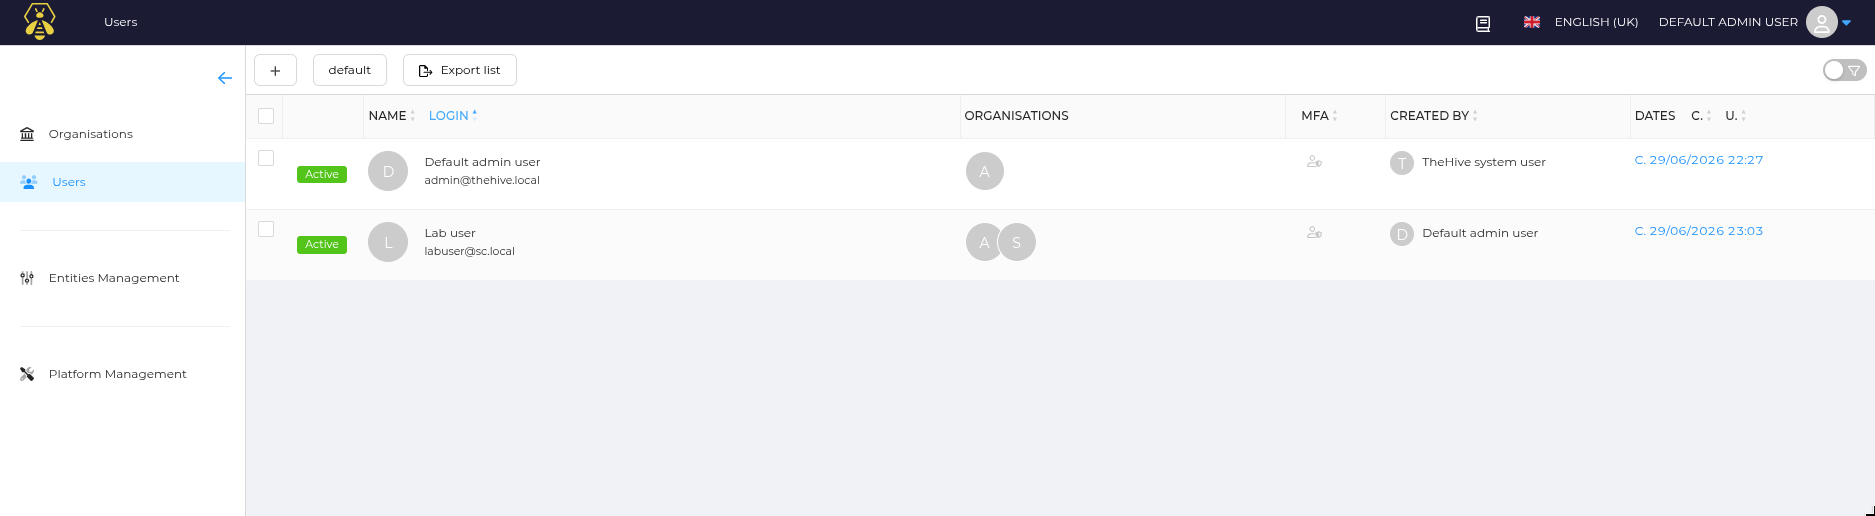
Just like MISP, we will add our organization and Users.
Adding Samyak Corporation
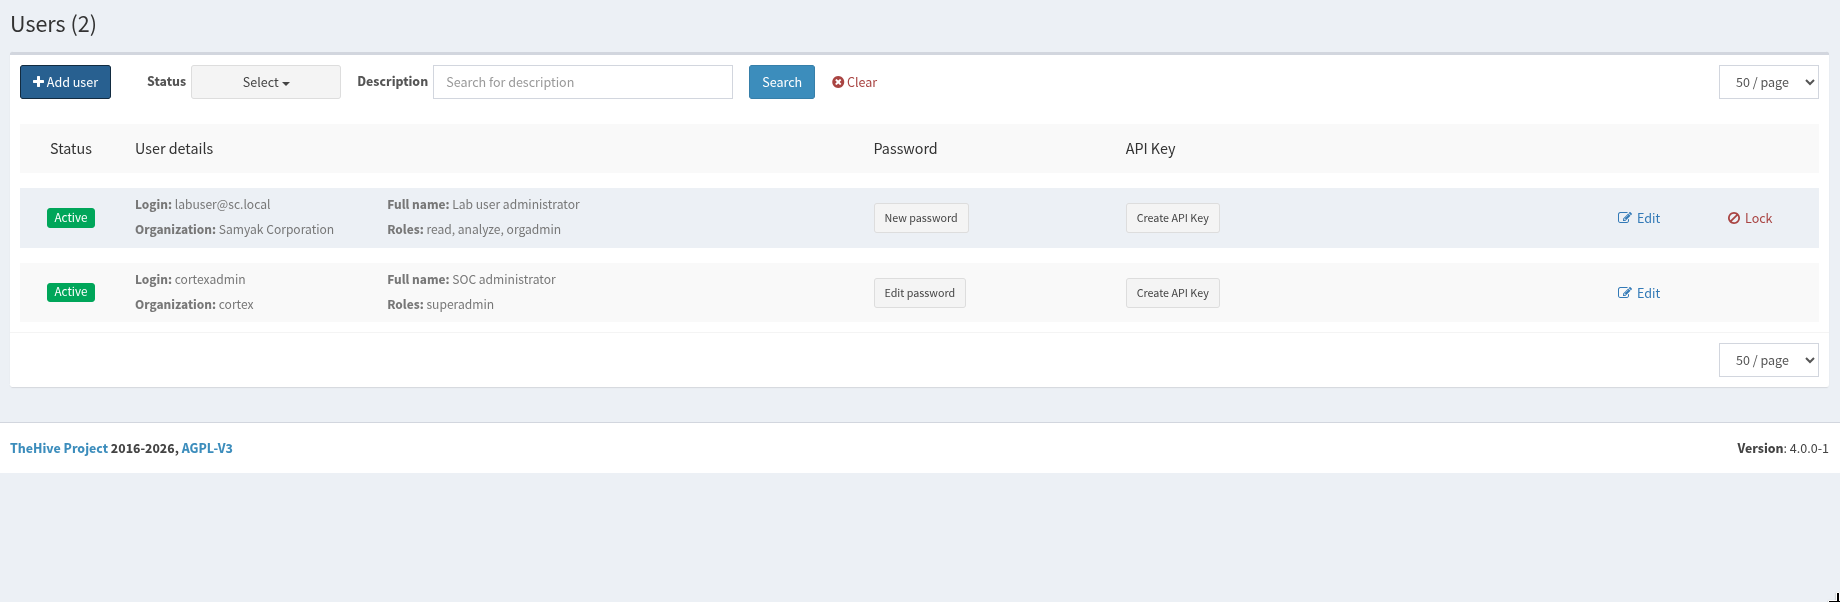
Adding a orgadmin user, Set a password and create an API key (NOTE THE KEY).
THE HIVE
http://10.0.0.136:9000
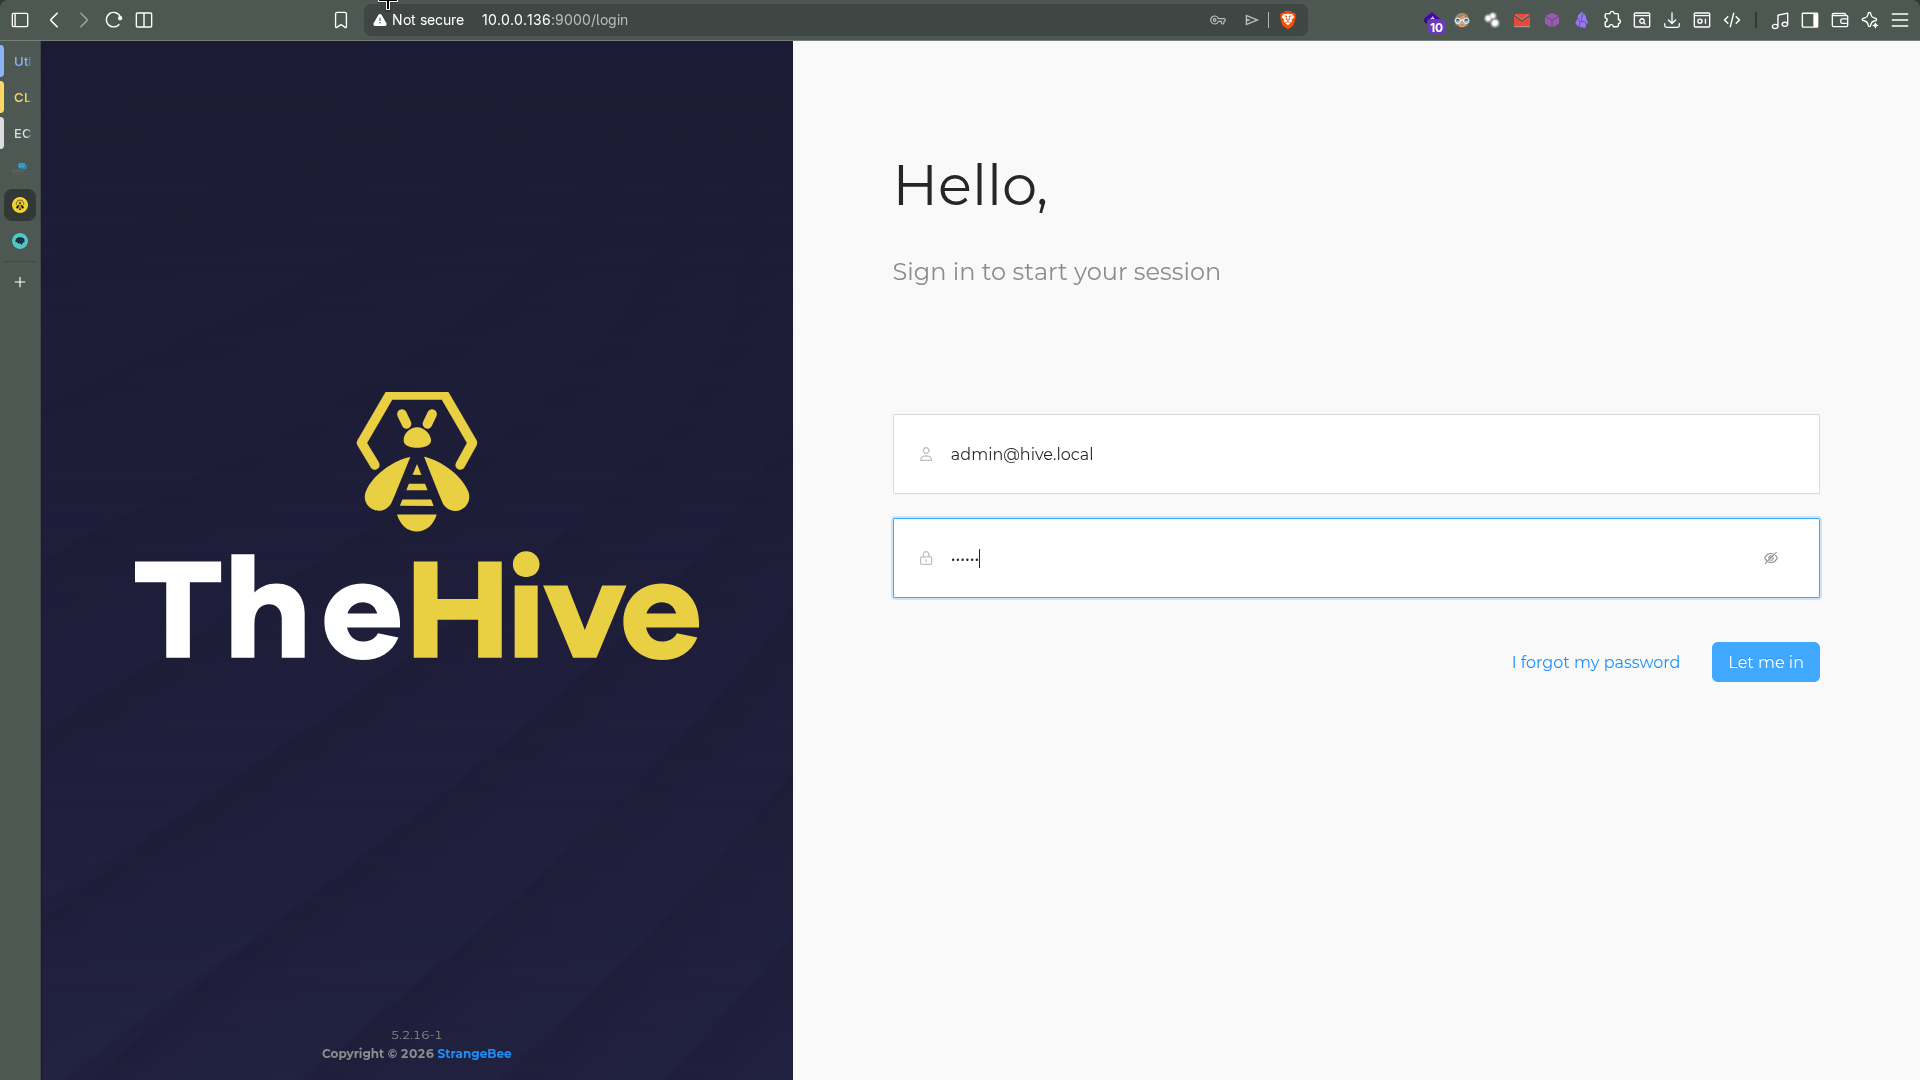
admin@thehive.local:secret
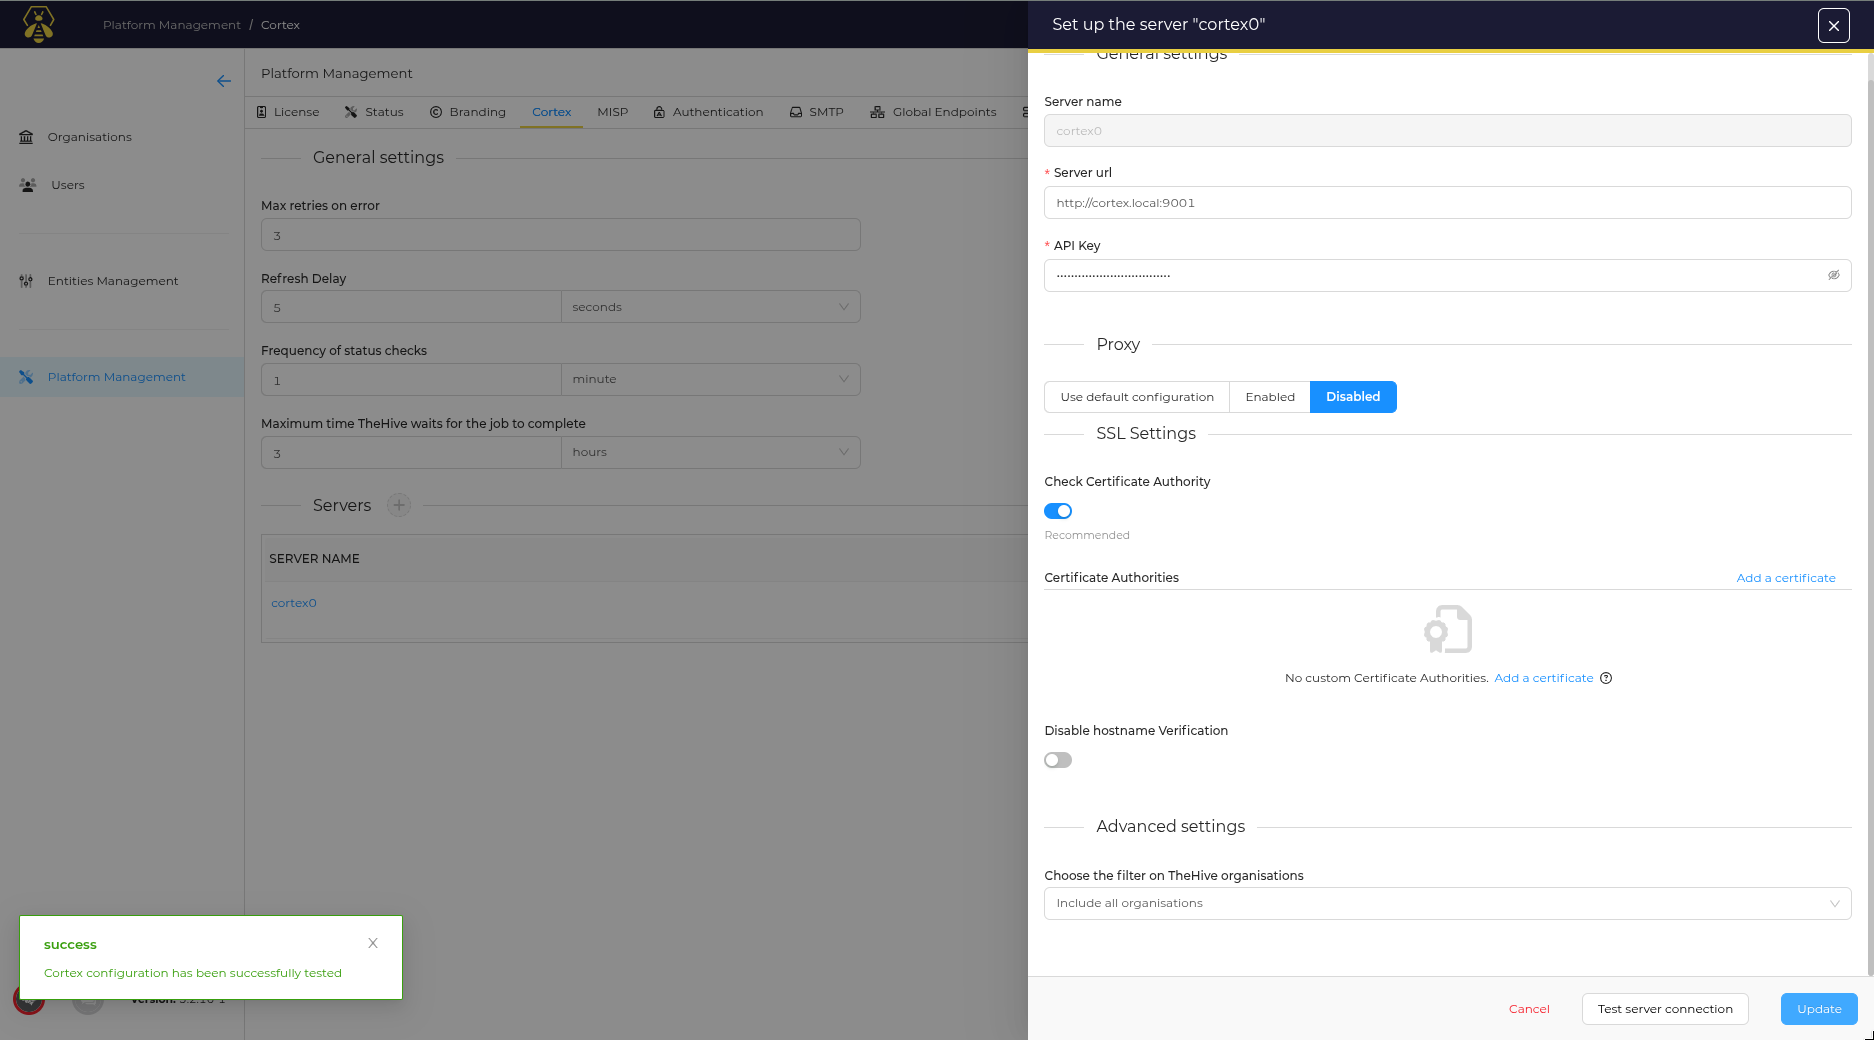
We will add the MISP and CORTEX servers.
Head to platform management > CORTEX, and create a server (if not created by default). add the URL as http://cortex.local:9001 and the API key
Test server connection and save.
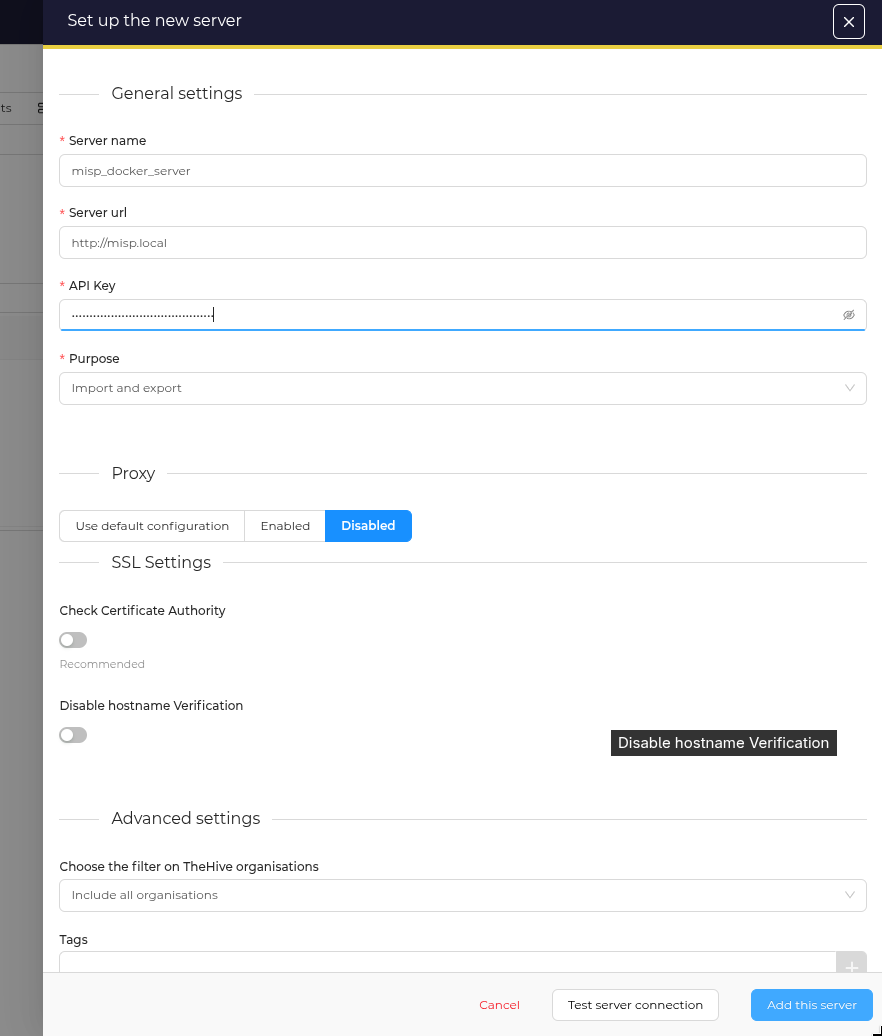
Do same with MISP.
NOTE: Turn of the check CA, as we are not using it in a lab environment (but in a prod environment we will need SSL security, so use CA).
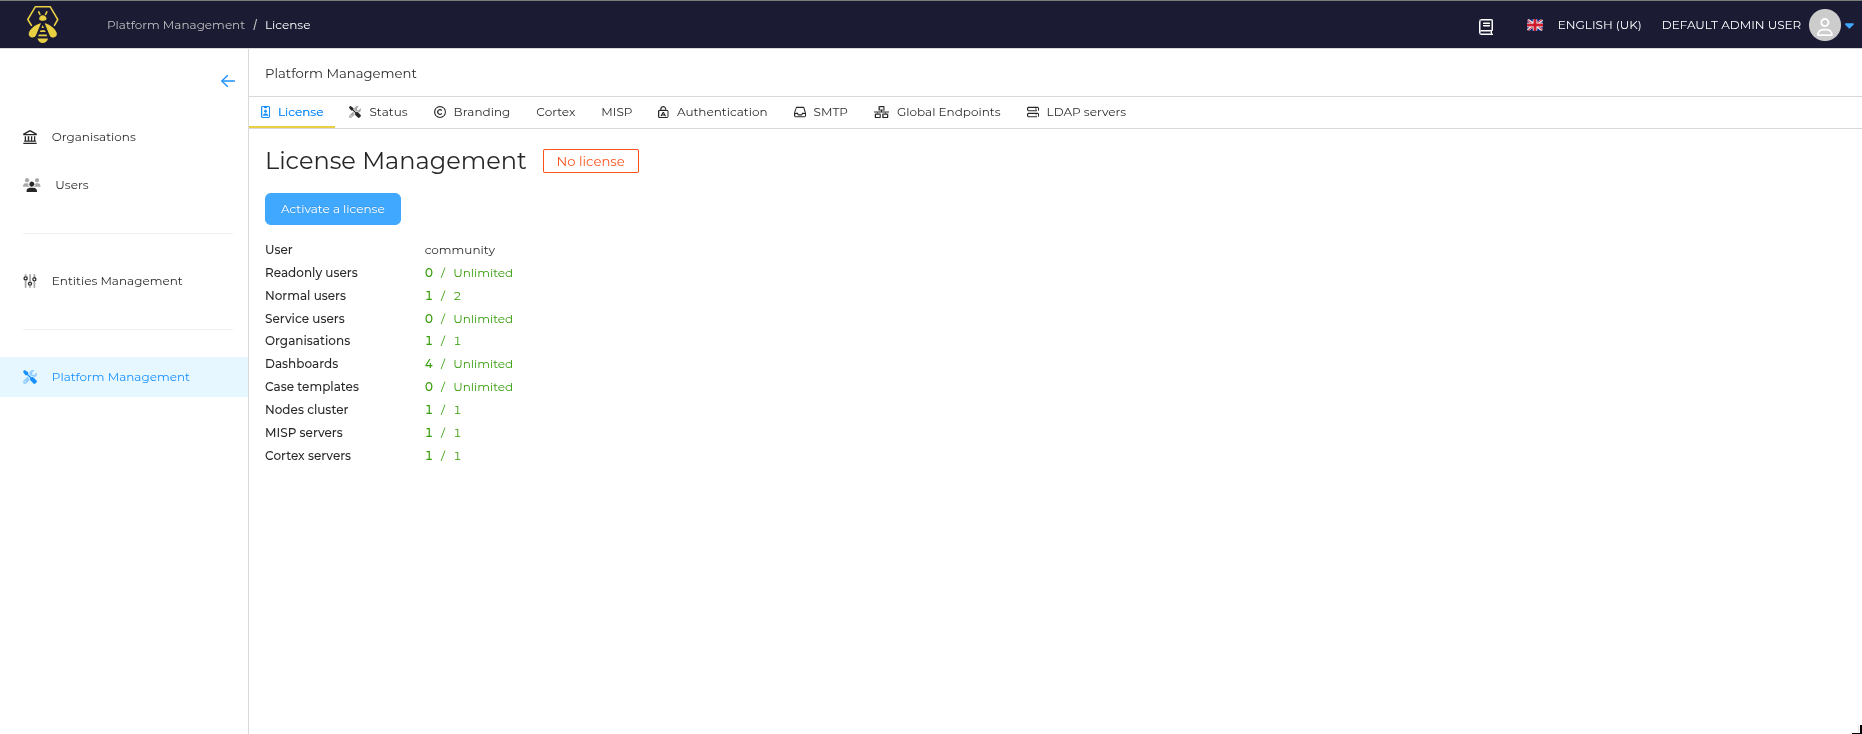
Check on the dashboard.
NOTE: The MISP server might take a while to connect.
Again, add and organization and an admin / Org admin user.
CORTEX ANALYZERS
Cortex comes with 100+ analyzers for various threat intel platform. Allowing automated analysis of any emails, IPs, domains or file hashes. So analysts won’t have to open ten browser tabs.
WHAT ARE THESE ANALYZERS ??
They are small programs (mostly python based), these analyzers are docker containers which cortex will spin-up as per requirement.
That’s why we gave the docker’s socket docker.sock to cortex container. So it can spin it’s own containers.
Also the cortex-jobs file is shared with the host as a volume, so the analyzer containers can read those jobs.
For this lab we will configure two of the free ones: Virutotal and MalwareBazaar
SETTING UP ANALYZERS
Login to cortex with the labuser@sc.local account we created.
Head to Organization > analyzers > search VirusTotal > Enable the VirusTotal_GetReport_3_1. Place the API key.
Repeat the same thing for MalwareBazaar_1_0 Analyzer. 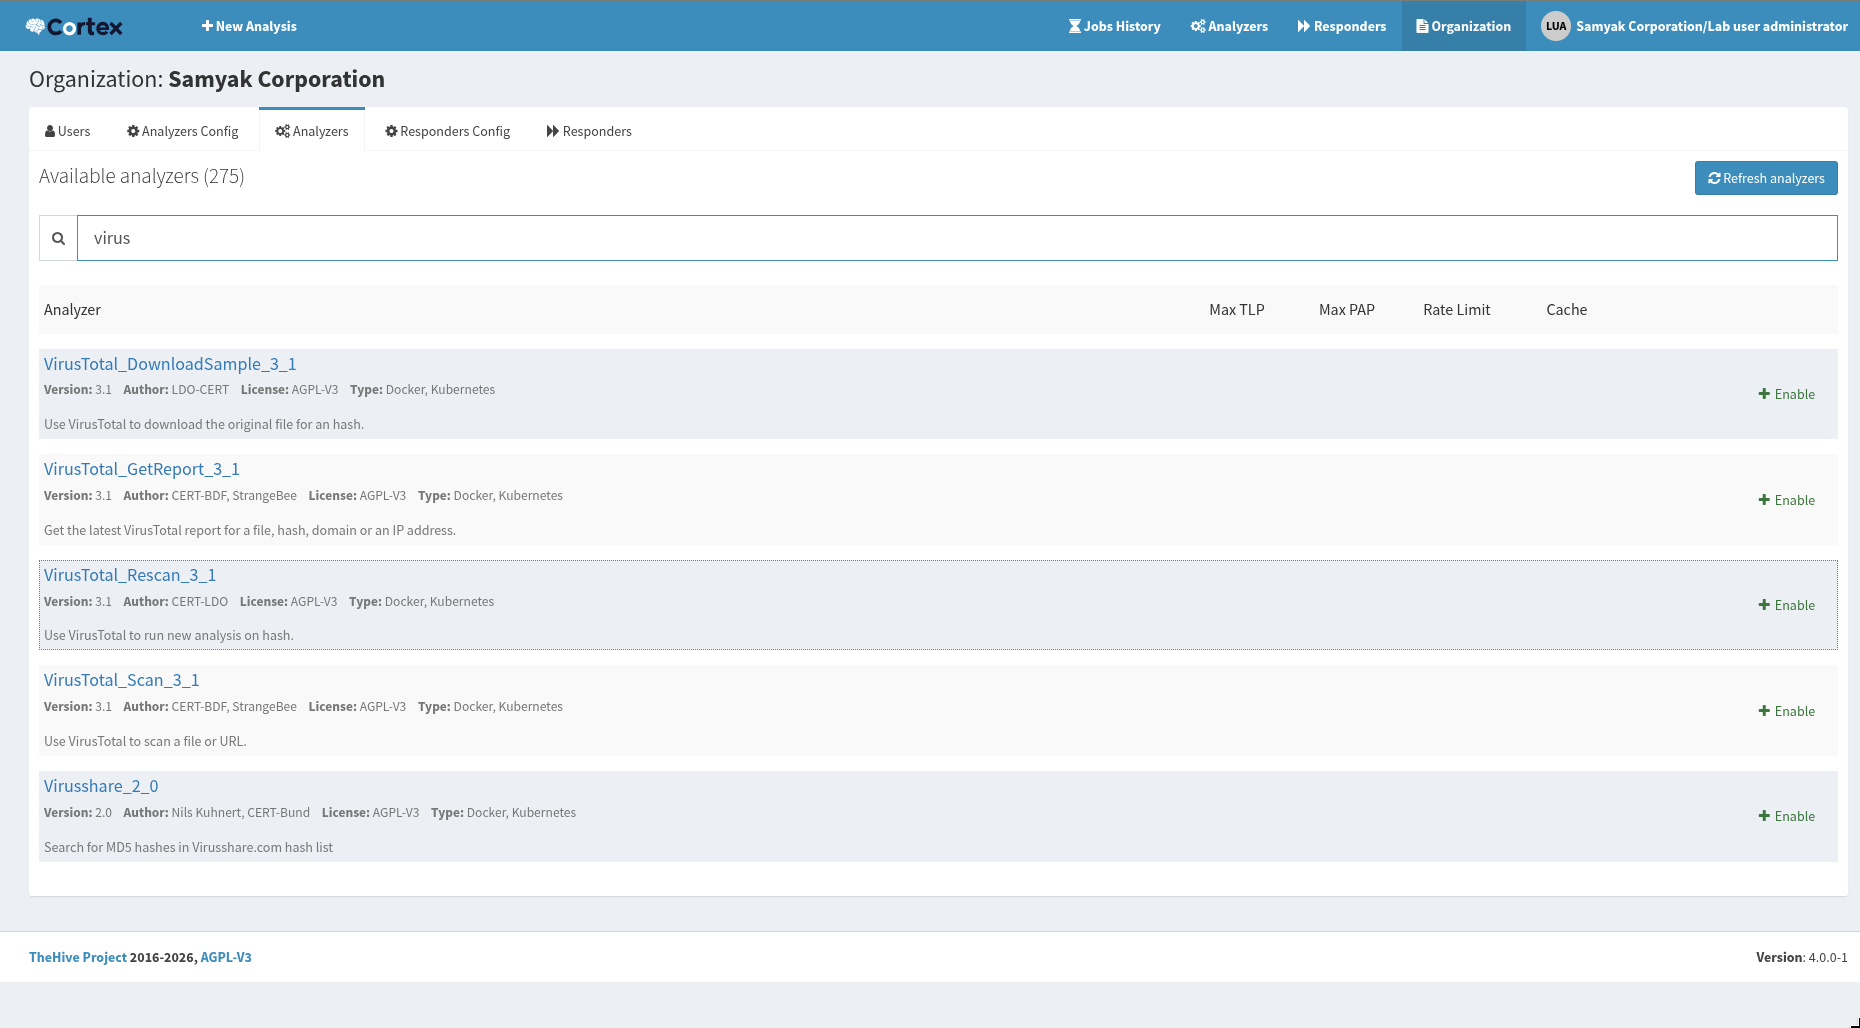
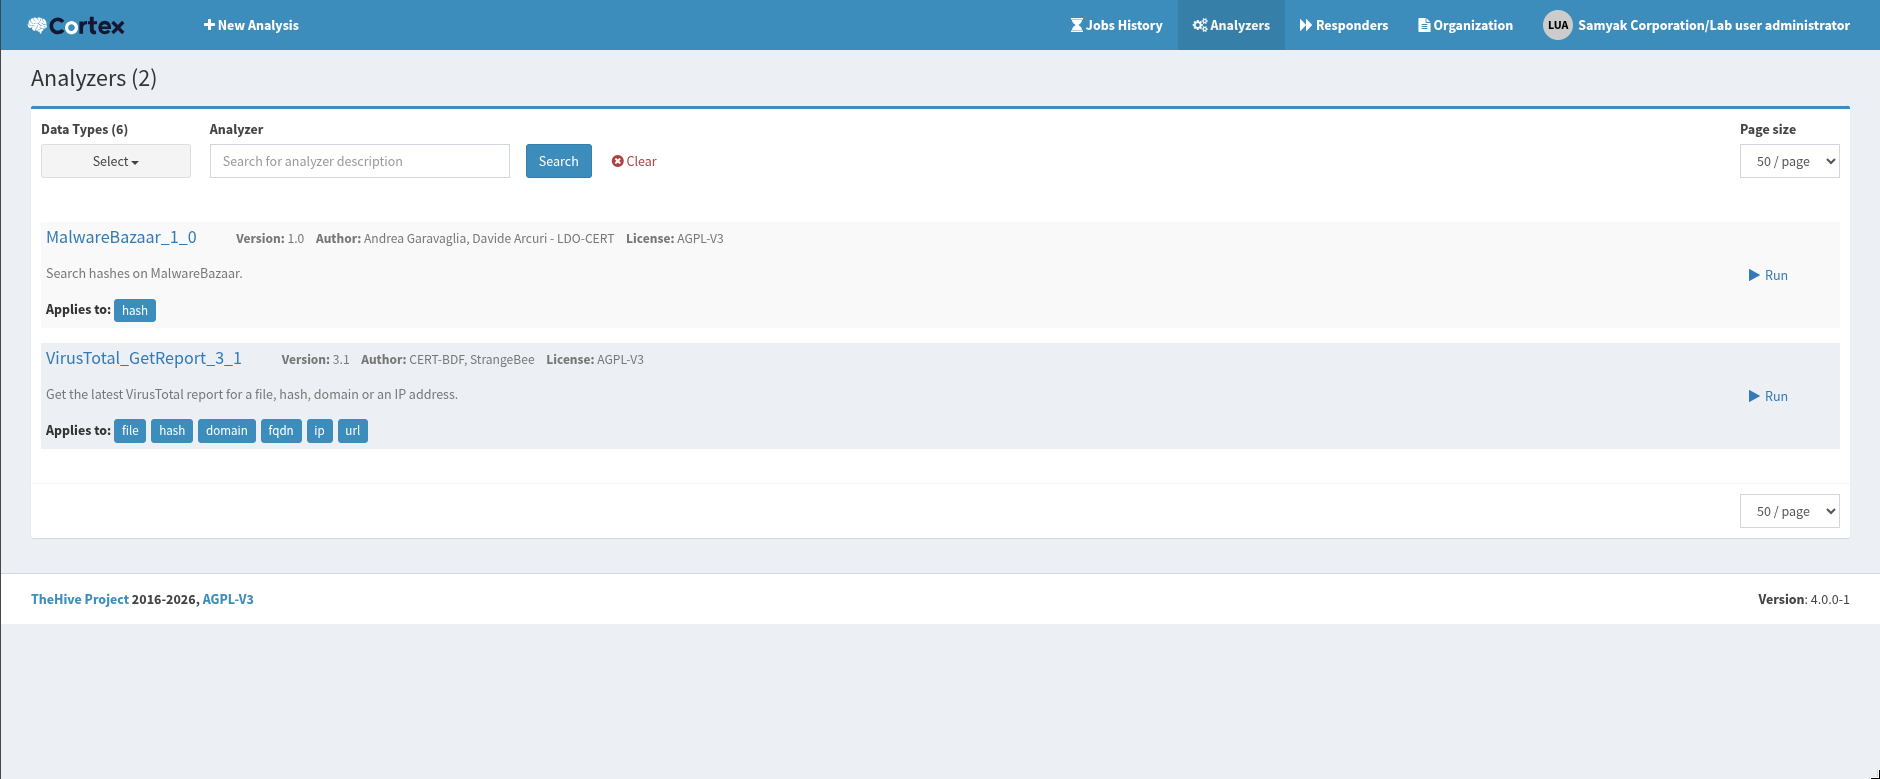
- TLP: It indicates how sensitive the information is for organization.
- PAP: What action an analyst can take, for a red PAP they can only take passive actions (checking alert logs), for an amber one they might upload it to a platform like VirusTotal, green allows us to take active actions (like blocking an IP), etc.
I picked a random malware hash from malware bazaar 9977df7ffd04173d38e0aefe3d028052e164aaa69c1facfe63af55b473dd9e24
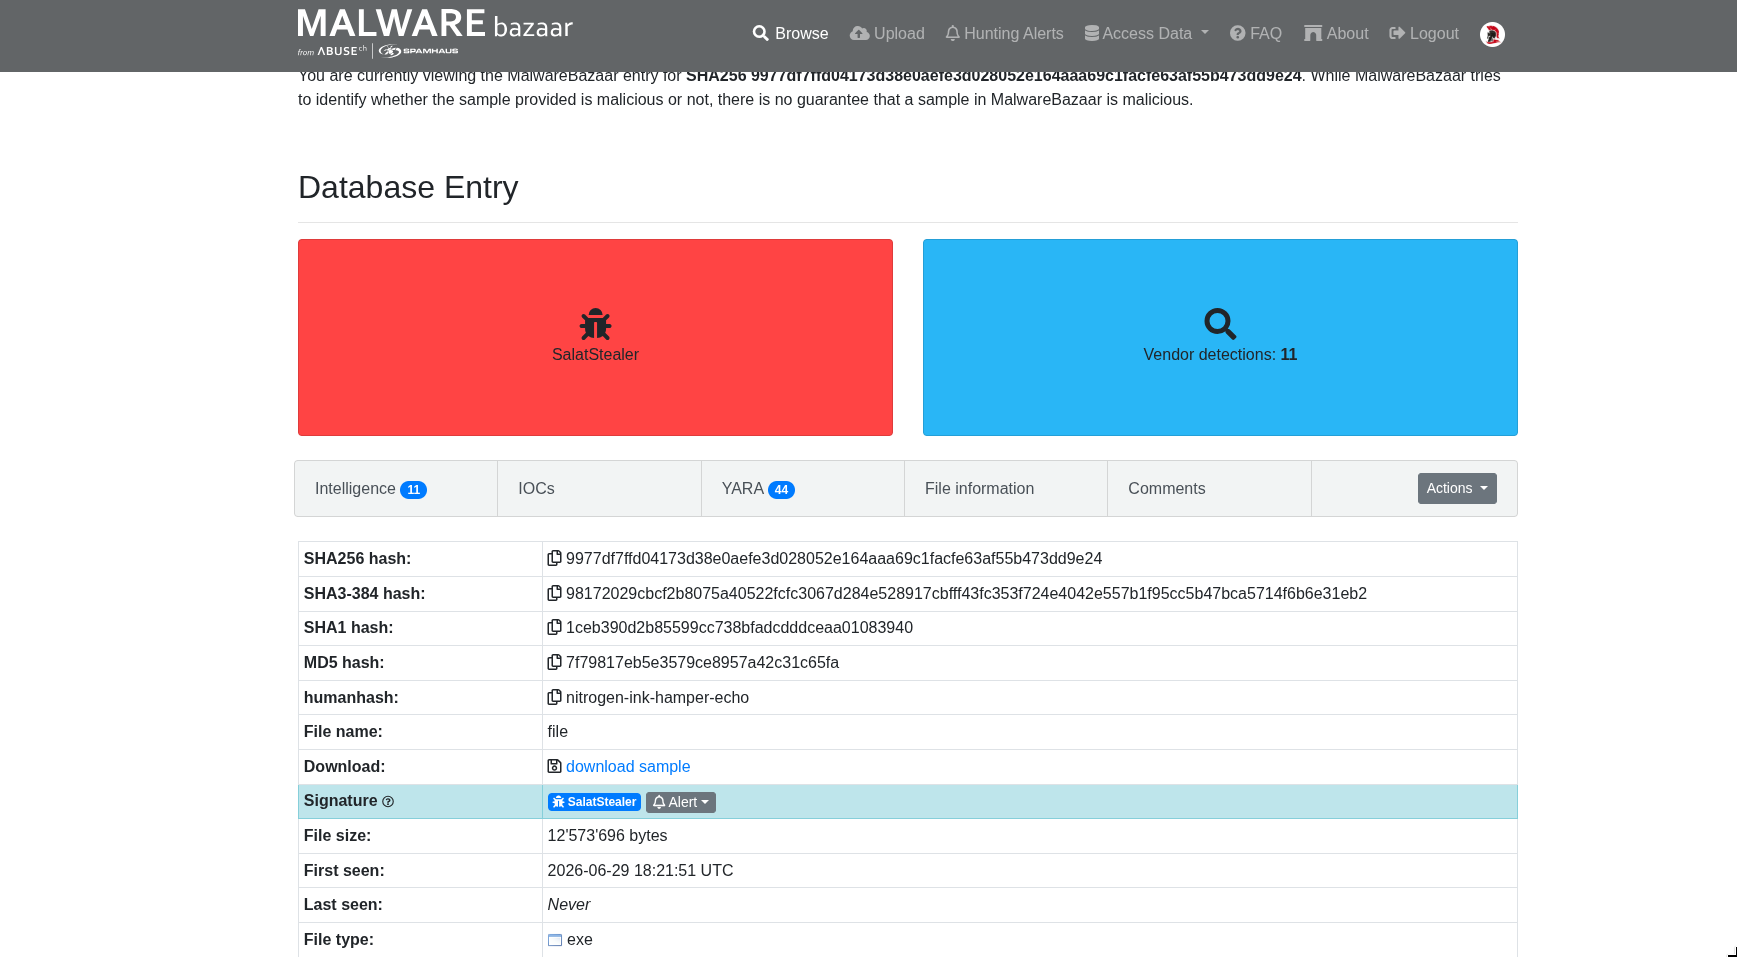
Look at this report.
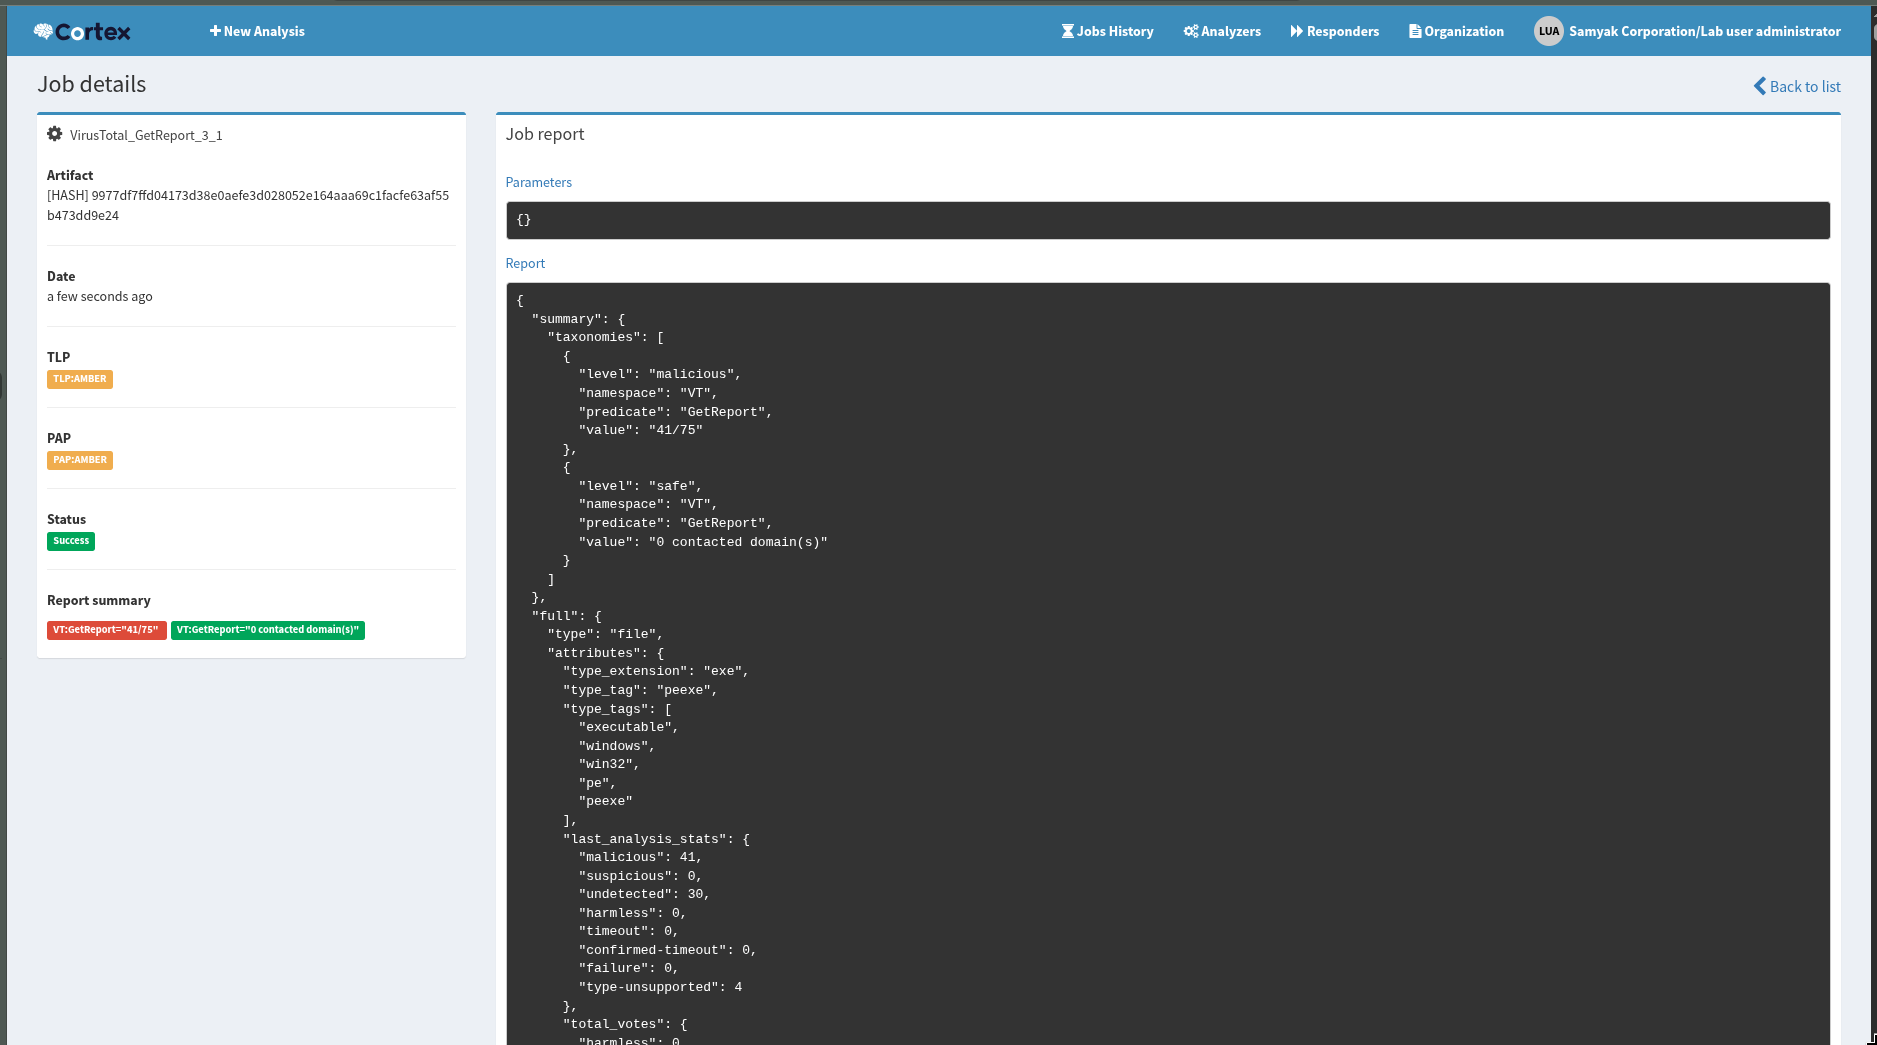
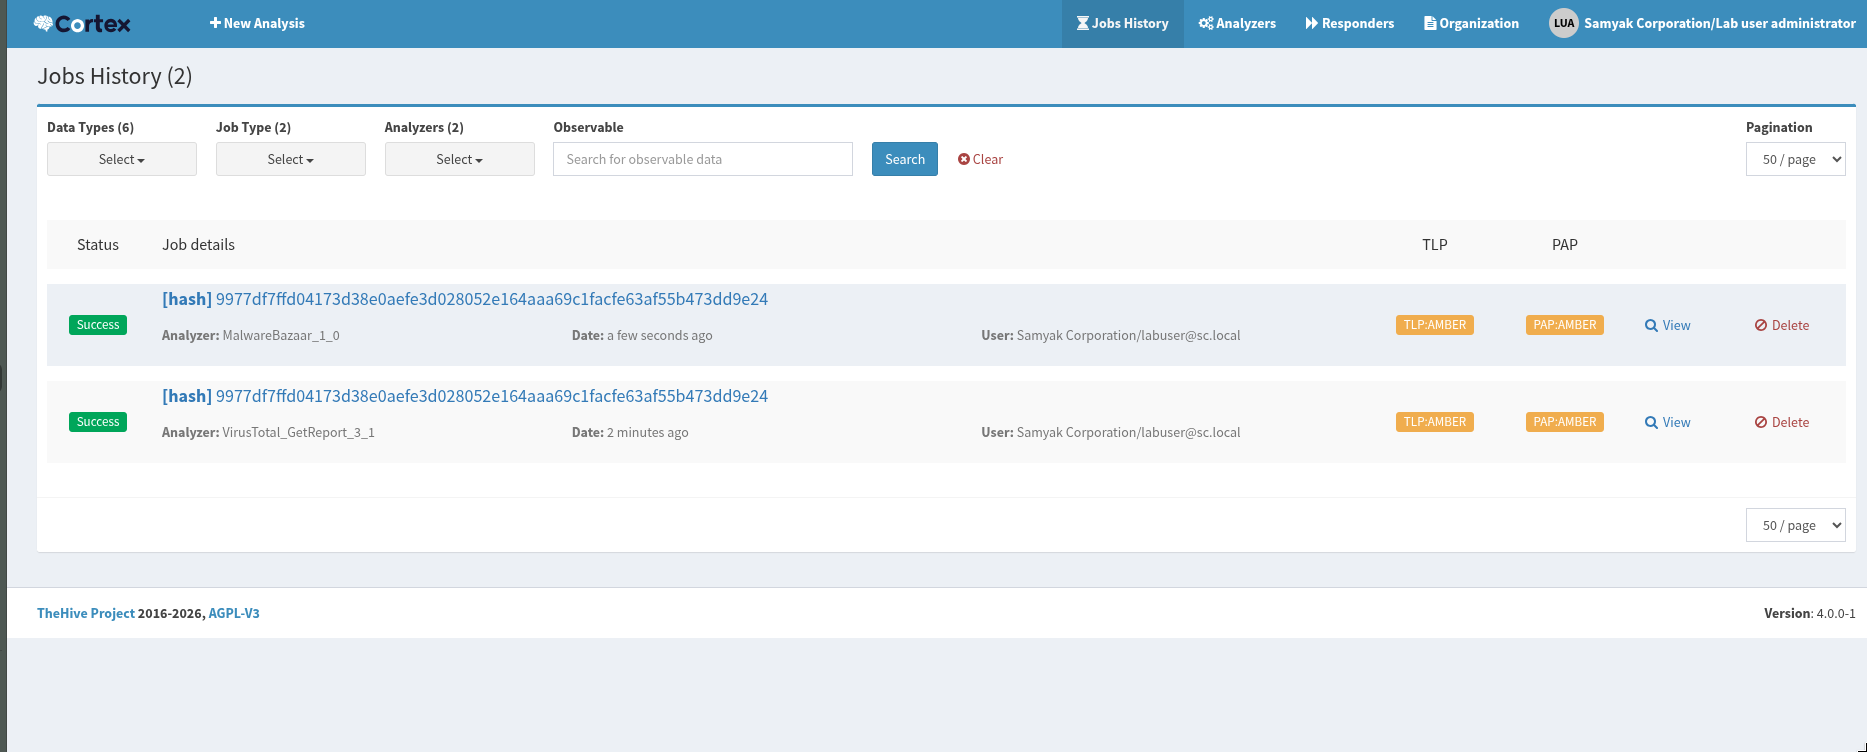
I will try to bring this JSON result to the HIVE for enrichment of alerts.
TROUBLESHOOTING
For me the CORTEX analyzers were failing initially for two reasons:
ONE: The analyzer containers run using the docker0 (default bridge network), Due to some bug it was down on my server. So all my other containers had a perfect internet connection but not those temporary container.
I had to put docker ps on watch and just as the temporary container spawned, used it’s ID to see which network it’s on.
Restarting the docker service helped.
TWO: For those who added thier user to the docker group (so we not have to do the sudo-fu).
Just as I ran docker compose, Socket’s and /tmp/cortex-jobs/ ownership was transferred to a user UID 1001 and GID 1001.
No user on my Ubuntu server had these UID so I transferred the ownership back to my user.
Now the Cortex analyzers were not working, looking at the logs I saw that cortex container couldn’t access /tmp/cortex-jobs.
1
2
3
4
5
6
7
8
9
10
11
12
13
14
# this is a bind mount so cortex-jobs is from ubuntu server.
# so this shoul have owner as 1001 (UID as cortex user not exist on container)
ls -ld /tmp/cortex-jobs
stat /tmp/cortex-jobs

## If not fix this
sudo chown 1001:1001 /tmp/cortex-jobs
sudo chmod 755 /tmp/cortex-jobs

# view container logs
docker logs -f soc-cortex

## shell to cortex.local container
docker exec -it soc-cortex bash
CONNECTING WAZUH TO THE HIVE
Install python on Ubuntu.
1
2
sudo yum update
sudo yum install python3
Download these scripts from here.
Install the hive’s API inside the Wazuh’s python environment.
1
sudo /var/ossec/framework/python/bin/pip3 install thehive4py==1.8.1
Create an integration script that converts wazuh alerts to hive’s alerts.
1
sudo nano /var/ossec/integrations/custom-w2thive.py
1
2
3
4
5
6
7
8
9
10
11
12
13
14
15
16
17
18
19
20
21
22
23
24
25
26
27
28
29
30
31
32
33
34
35
36
37
38
39
40
41
42
43
44
45
46
47
48
49
50
51
52
53
54
55
56
57
58
59
60
61
62
63
64
65
66
67
68
69
70
71
72
73
74
75
76
77
78
79
80
81
82
83
84
#!/var/ossec/framework/python/bin/python3
import json
import sys
import os
import re
import logging
import uuid
from thehive4py.api import TheHiveApi
from thehive4py.models import Alert, AlertArtifact

# ===== USER CONFIG =====
lvl_threshold = 0
suricata_lvl_threshold = 3
debug_enabled = False
info_enabled = True
# =======================

pwd = os.path.dirname(os.path.dirname(os.path.realpath(__file__)))
log_file = f"{pwd}/logs/integrations.log"

logger = logging.getLogger(__name__)
logger.setLevel(logging.INFO if info_enabled else logging.WARNING)

fh = logging.FileHandler(log_file)
formatter = logging.Formatter('%(asctime)s - %(levelname)s - %(message)s')
fh.setFormatter(formatter)
logger.addHandler(fh)

def pr(data, prefix, alt):
    for key, value in data.items():
        if isinstance(value, dict):
            pr(value, f"{prefix}.{key}", alt)
        else:
            alt.append(f"{prefix}.{key}|||{value}")
    return alt

def md_format(alt):
    out = ""
    for item in alt:
        k, v = item.split("|||", 1)
        out += f"**{k}** : {v}\n"
    return out

def artifact_detect(text):
    artifacts = []
    ips = re.findall(r'\d+\.\d+\.\d+\.\d+', text)
    for ip in ips:
        artifacts.append(AlertArtifact(dataType="ip", data=ip))
    return artifacts

def main(args):
    alert_file = args[1]
    api_key = args[2]
    hive_url = args[3]

    hive = TheHiveApi(hive_url, api_key)
    w_alert = json.load(open(alert_file))

    alt = pr(w_alert, "", [])
    description = md_format(alt)
    artifacts = artifact_detect(description)

    sourceRef = str(uuid.uuid4())[:6]

    alert = Alert(
        title=w_alert["rule"]["description"],
        tlp=2,
        tags=["wazuh"],
        description=description,
        type="wazuh",
        source="wazuh",
        sourceRef=sourceRef,
        artifacts=artifacts
    )

    if int(w_alert["rule"]["level"]) >= lvl_threshold:
        res = hive.create_alert(alert)
        if res.status_code == 201:
            logger.info("Alert sent to TheHive")
        else:
            logger.error(res.text)

if __name__ == "__main__":
    main(sys.argv)
Next we make a launcher script.
1
sudo nano /var/ossec/integrations/custom-w2thive
1
2
3
4
5
6
7
8
9
10
11
12
13
14
15
16
17
18
19
20
21
22
23
24
25
26
27
28
29
#!/bin/sh

WPYTHON_BIN="framework/python/bin/python3"
SCRIPT_PATH_NAME="$0"
DIR_NAME="$(cd $(dirname ${SCRIPT_PATH_NAME}); pwd -P)"
SCRIPT_NAME="$(basename ${SCRIPT_PATH_NAME})"

case ${DIR_NAME} in
    */active-response/bin | */wodles*)
        if [ -z "${WAZUH_PATH}" ]; then
            WAZUH_PATH="$(cd ${DIR_NAME}/../..; pwd)"
        fi
        PYTHON_SCRIPT="${DIR_NAME}/${SCRIPT_NAME}.py"
    ;;
    */bin)
        if [ -z "${WAZUH_PATH}" ]; then
            WAZUH_PATH="$(cd ${DIR_NAME}/..; pwd)"
        fi
        PYTHON_SCRIPT="${WAZUH_PATH}/framework/scripts/${SCRIPT_NAME}.py"
    ;;
    */integrations)
        if [ -z "${WAZUH_PATH}" ]; then
            WAZUH_PATH="$(cd ${DIR_NAME}/..; pwd)"
        fi
        PYTHON_SCRIPT="${DIR_NAME}/${SCRIPT_NAME}.py"
    ;;
esac

${WAZUH_PATH}/${WPYTHON_BIN} ${PYTHON_SCRIPT} "$@"
Set proper permissions:
1
2
3
4
sudo chmod 755 /var/ossec/integrations/custom-w2thive.py
sudo chmod 755 /var/ossec/integrations/custom-w2thive
sudo chown root:wazuh /var/ossec/integrations/custom-w2thive.py
sudo chown root:wazuh /var/ossec/integrations/custom-w2thive
Go to the Hive and make a service account like apiuser@sc.local generate an API key for that user and use it below.
Open this file
1
sudo vim /var/ossec/etc/ossec.conf
Paste this somewhere.
1
2
3
4
5
6
<integration>
  <name>custom-w2thive</name>
  <hook_url>http://Ubuntu_Server_IP:9000</hook_url>
  <api_key>YOUR_THEHIVE_API_KEY</api_key>
  <alert_format>json</alert_format>
</integration>
Restart wazuh-manager
1
sudo systemctl restart wazuh-manager
See the alerts should be in the hive. 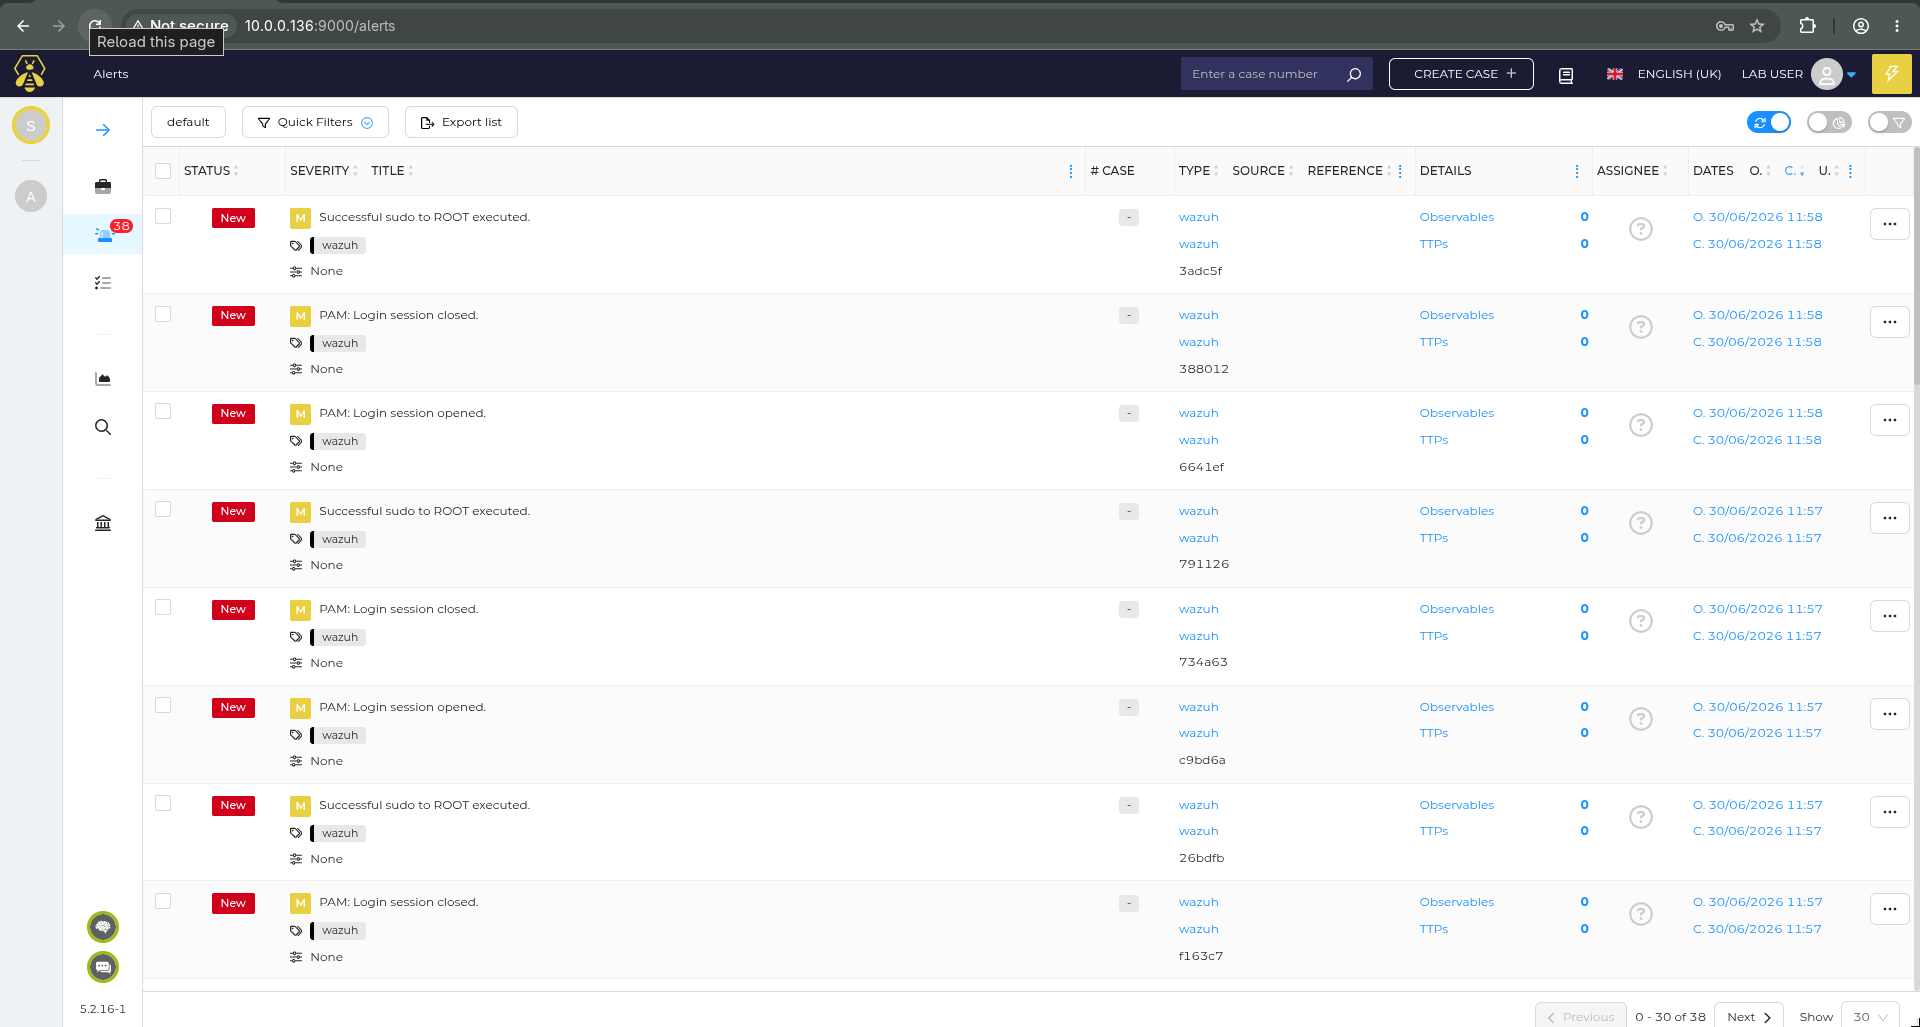
Now we can take actions, assign it to a user, etc. 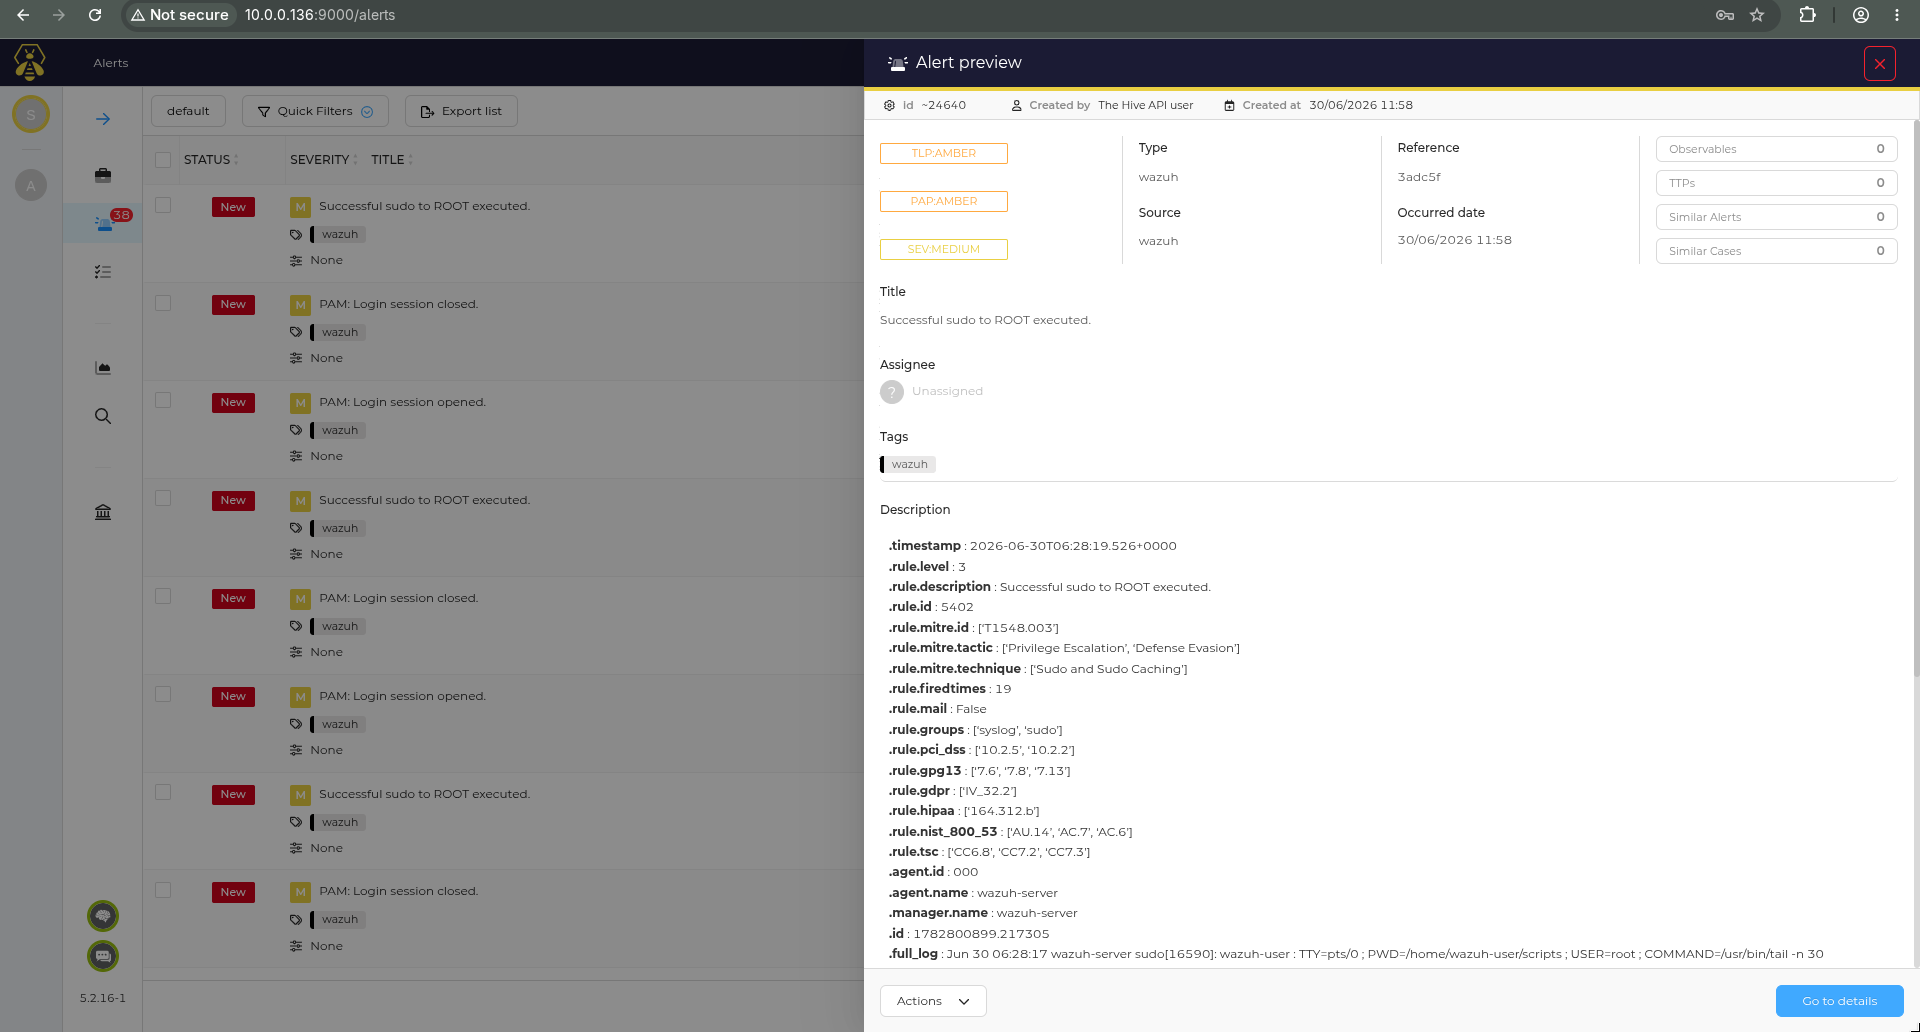
NOTE
I had successfully deployed and integrated these awesome open-source security products.
Still checking the testing this deployment is remaining.
I will publish an update as soon as I get the time.